


Check out the 1920s Sonor drums and hardware! a double pedal? In the twenties? Really?
Billy “Thunder” Mason & Friends Show

Nashville drummer Billy “Thunder” Mason is holding his first-ever Billy “Thunder” Mason & Friends Show at Nashville’s Wildhorse Saloon on Thursday, July 9, 2015 at 6:30 pm. Billy’s diverse guests include YANNI drummer Charlie Adams, CHER/PINK drummer Mark Schulman and LOVERBOY’s Matt Frenette.
Billy’s set is very ‘immersive’ by way of utilizing concert footage from his time performing with country music star TIM MCGRAW. There are some surprise performances thrown in, but you’ll have to attend to witness those! Including a mix of Country, Pop, Rock and Classical genres, this show is sure to entertain all family audience members! Come and enjoy this first-ever drumming extravaganza with Billy “Thunder” Mason!
THE VENUE: The Wildhorse Saloon Nashville Address: 120 2nd Ave N, Nashville, TN 37201 Phone: (615) 902-8200
The Wildhorse Saloon will be open to the public. Attendees wishing to be eligible for free giveaways MUST purchase a $20 ticket. The fee gives those attendees VIP seating in the venue’s dance floor area. Tickets are available through the Wildhorse Saloon’s gift shop all-day Thursday. Call: Michelle Hamilton at: (903) 748-7955 to have your name placed on the will call list as well and you can pay for your ticket at the door. The Wildhorse Saloon will begin accepting clinic tickets at 5:00 pm this Thursday.
A portion of the proceeds support OPERATION TROOP AID. This show is a first-of-it’s-kind - don’t miss it!

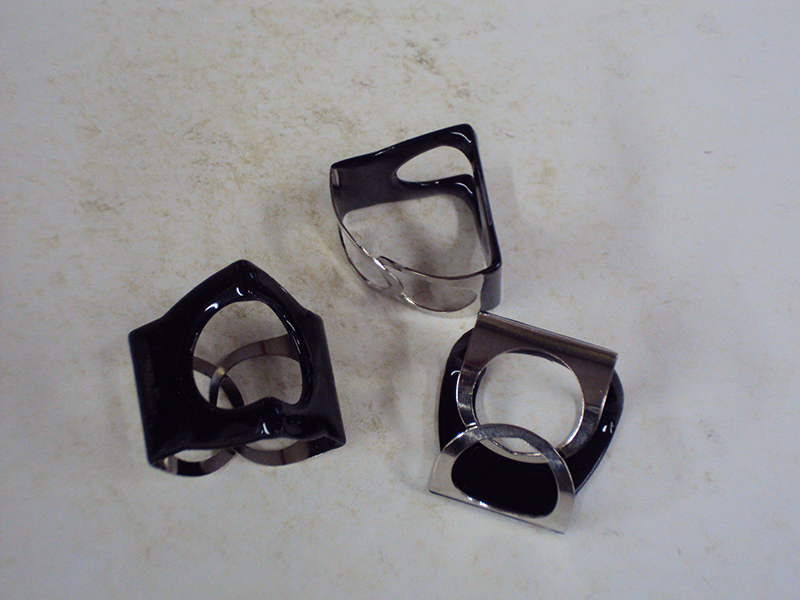
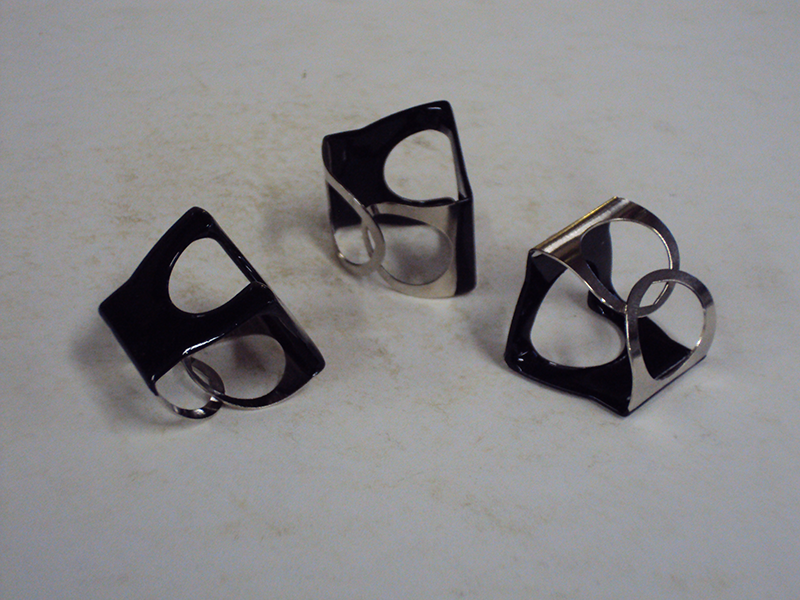
PinchClip Review
Every once in a while you stumble across something so simple and so useful, you just stop and ask yourself: why didn’t I think of that? Straight from the fertile mind of William “Bill” Feldman, comes a simple accessory that almost rivals the paperclip, and it’s just for us drummers. PinchClip was designed to replace wing nuts and other conventional “nuts” for cymbal stands, accessories, and hi-hat clutches. In just about any situation that you’re using some sort of screw-nut or have a lip to attach to, you can apply a PinchClip.
Just squeeze the PinchClip together with your fingers and place it on the threaded rod of the cymbal tilter and forget about it. Not only will it cut down on the time spent messing around with a wing nut, it will also allow you to properly adjust the space between the “nut” and the cymbal. This small detail will allow you to decide on the fly, how you want that plate swing, or not to swing. PinchClip grips so tight I literally picked up the stand with the plate attached, by the PinchClip, and took the entire assembly for a walk around my studio! No problem!
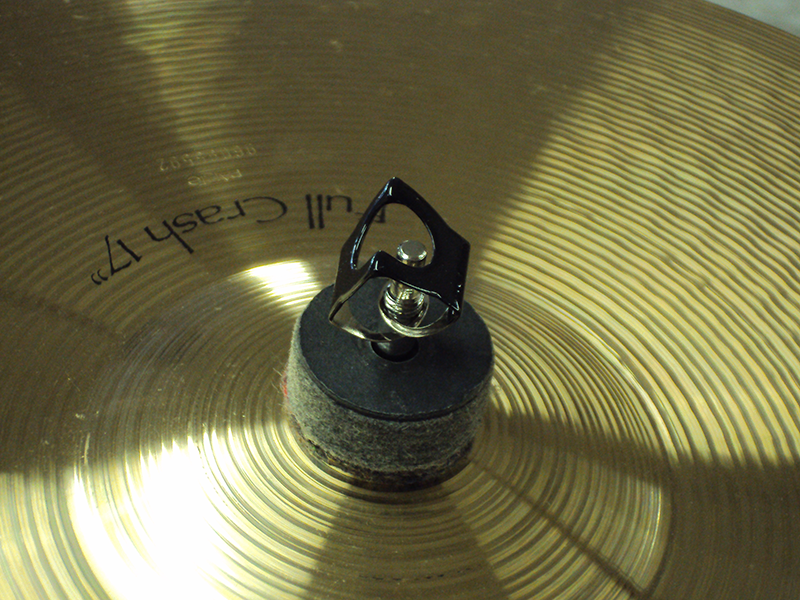
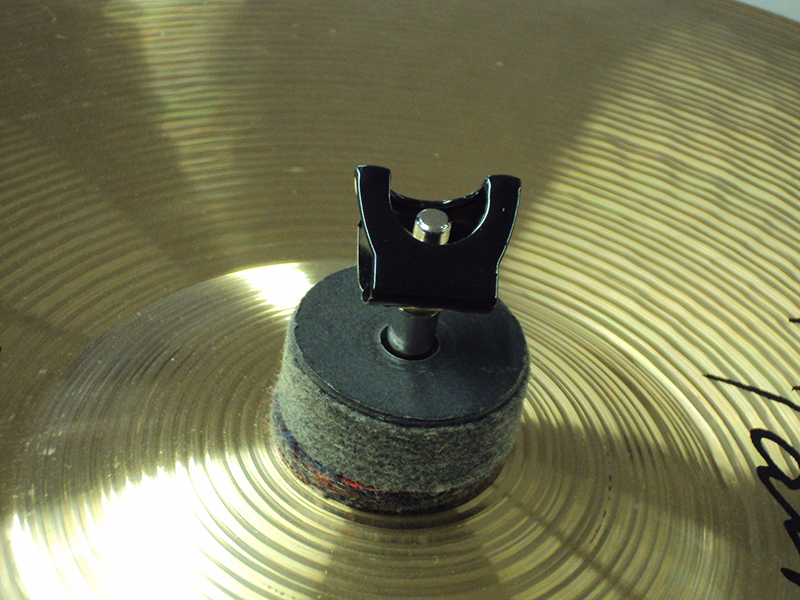
The next little trick I tried came directly from Bill. He suggested I attach the PinchClip to the bottom of the hi-hat clutch, replacing the screw nut. One thing I really don’t like is having the bottom nut of the clutch work its way loose in the middle of a tune and fall off. You know the game: the top plate stops moving and you no longer have hat control. This worked really well for me, and when it was time to set up and then tear down, the task was done in a moment. You can also apply it to the top position of the clutch, essentially replacing that nut as well.
Bill Feldman is a working architect who studied product design in college and just thought there was a better way to set up and tear down his drum set and save time in the process. PinchClip works very much like a binder clip and is made of specially treated spring steel and is available in a vinyl coated red or black color. At some point in the future, I would expect additions colors to become available.
I must say, I think this is one of those little gadgets that’s very much worth your consideration. Not only did it work as well as advertised, it looks really cool, too. Anywhere you use a conventional nut, you could probably apply a PinchClip. Just think: no more wasting time and effort searching for those dropped wing nuts concealed in the dark and cluttered mess of a stage following a gig. You might even save enough time tearing down to beat the singer or even a horn player out the door for change!
From Lancaster County PA……Thoughts from the Shop.
Brian Hill
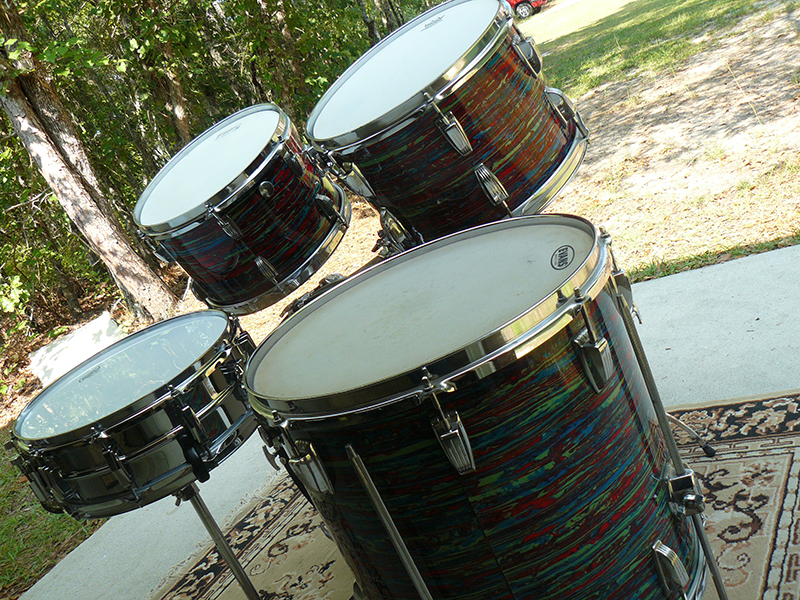
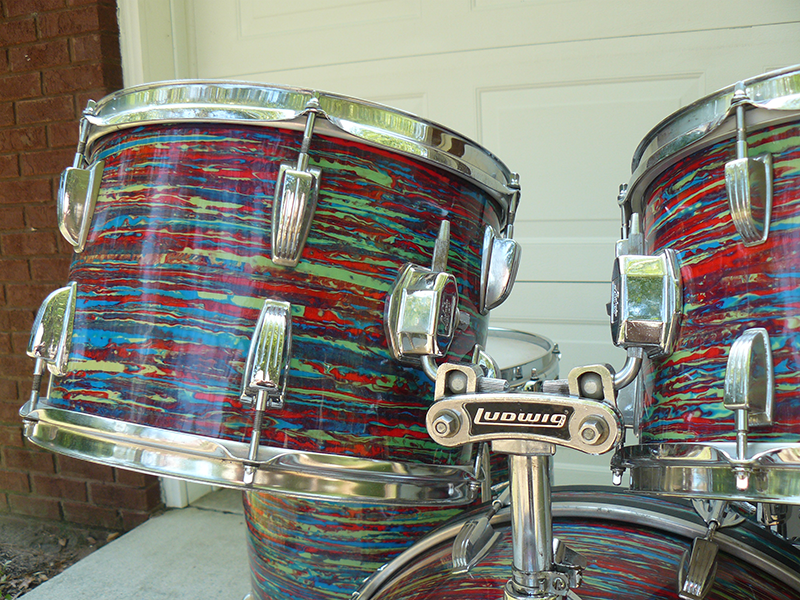
1969 Ludwig Psychedelic Red Hollywood Drum Set
It's really warming up for us here in the deep south. I hope your Summer has begun well. I got out early this morning to photograph this drum set for my article and I am still sweating all over the drums as I set them up. I know this set is not mint, but they are a good example of this attractive and desirable finish. I have been writing for the magazine for a while and the reason they keep me around, I guess, is because I am just a regular collector like most of you. I am not a super rich man with unlimited funds to spend on drums. Boy if I were rich I would go wild at the drum shows and keep E-Bay and UPS very happy. Instead, I save for a while and look until I find a kit or snare that really turns me on. I have bought a few pieces every year for the past twenty years, and sold a few pieces now and then. I have sought to improve the collection as I go along. I will buy a set in a finish I like, and when the set in the same finish in better condition comes along, I'll buy it and sell mine. I really don't consider myself a hoarder. I don't have five matching drums in the same finish or anything like that. If I have an extra drum in a finish another collector wants I share up.
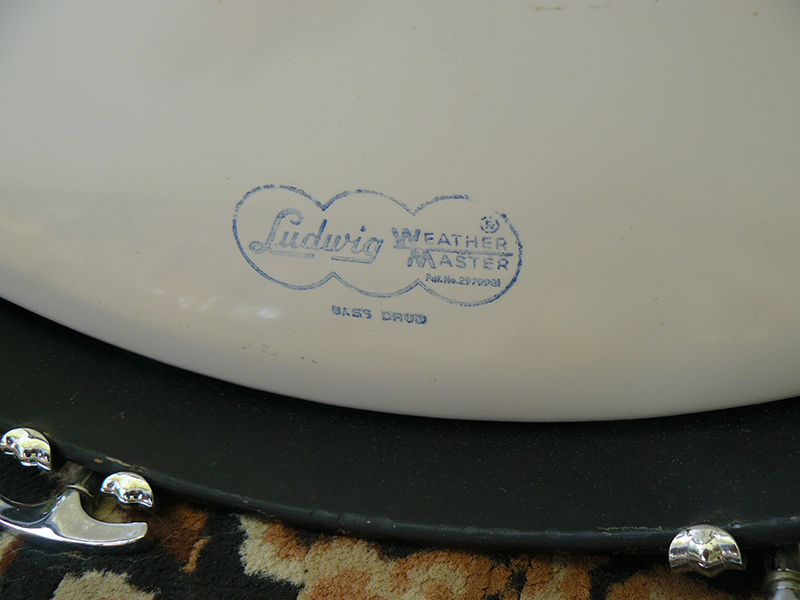
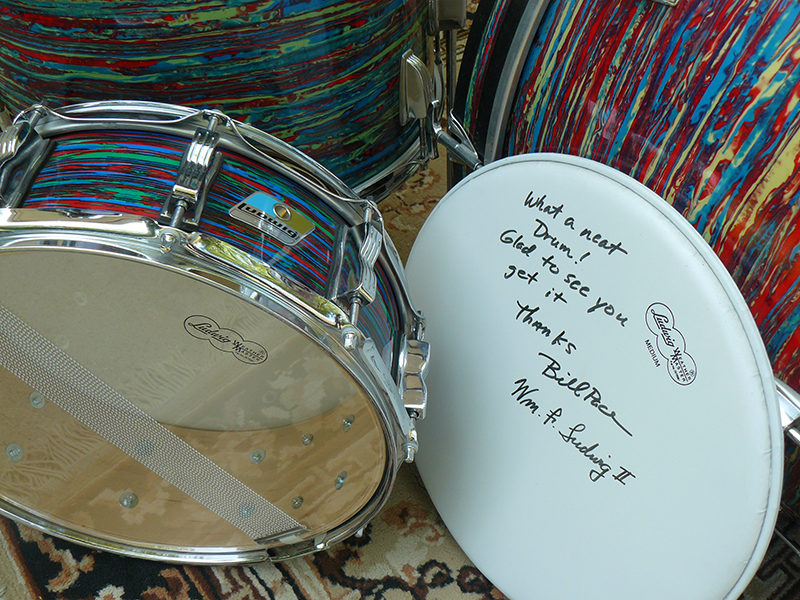
The set I am featuring this month is a beautiful Ludwig Hollywood set from 1969. The wrap is Ludwig's exclusive Psychedelic Red Pearl finish. The big drum companies of that day mostly shared the sparkle colors and pearl finishes on their drums, but no other drum company dared to offer this finish, so it was only on the Ludwig sets. Ludwig tried two other psychedelic finishes on their drums, but they were not as successful in sales compared to this awesome finish. I don't have the time nor words to describe what psychedelic means to us who were from the sixties, but suffice it to say we loved everything psychedelic during that period of our lives. The wild colors are a part of that movement, and these drums are very colorful. Someone described this finish as looking like a "frog in a blender." The badges are the Blue Olive parallelograms that replaced the Keystone badges that year. The interiors are natural maple that has been clear coated. The sizes are typical for the Hollywood sets. Bass drum 22"X14", floor tom 16"X16", mounted toms 13"X9", and 12"X8". The snare is a 14"X5" chrome Supraphonic. This was the type snare that went out with most of the sets sold.
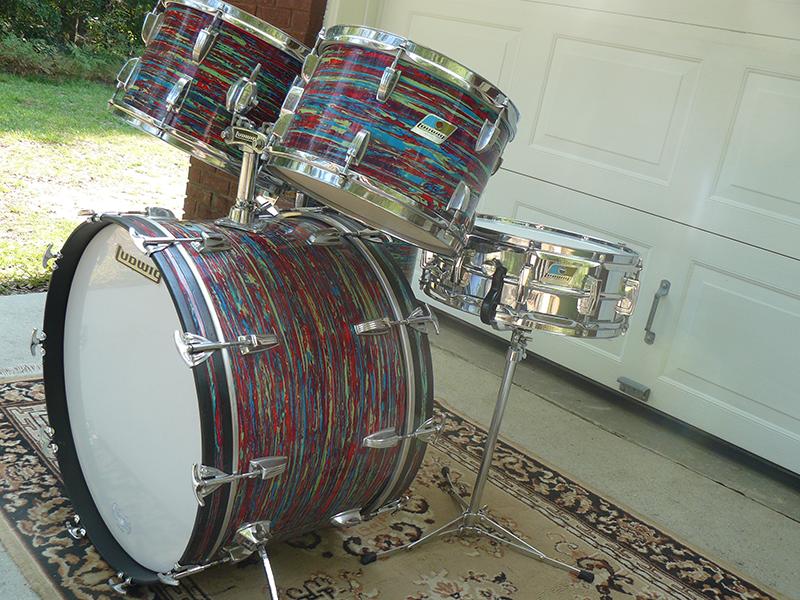


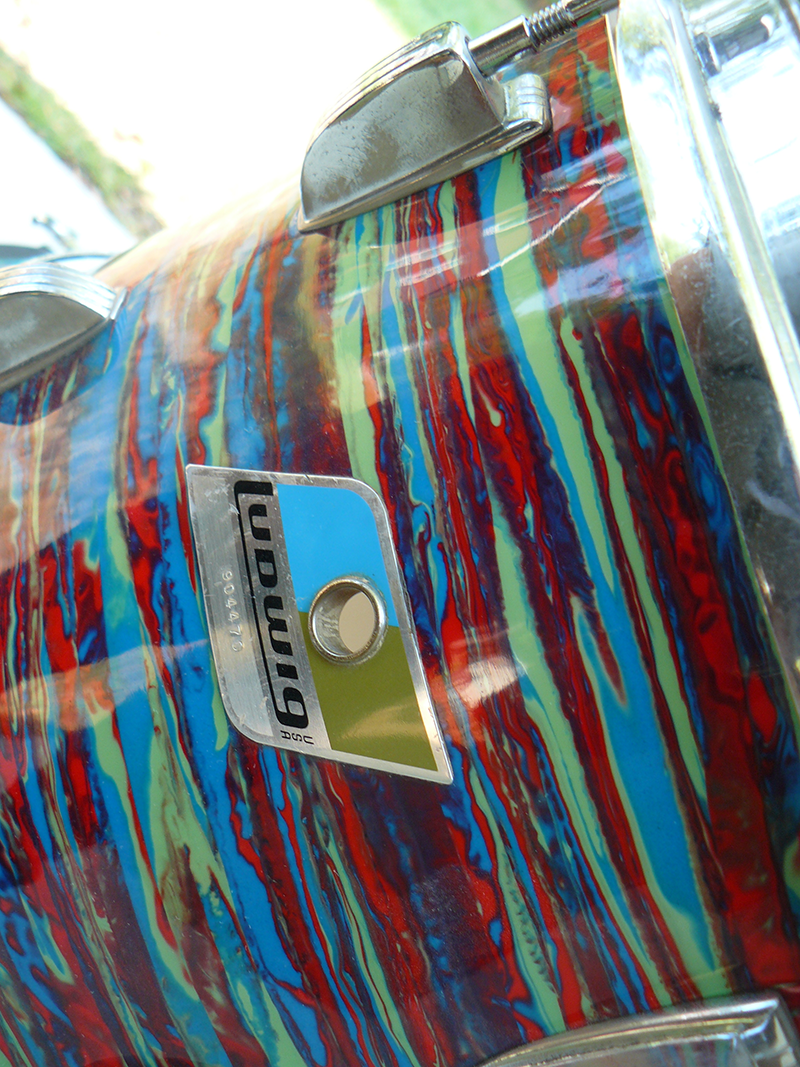
This was one of the earliest sets I bought when I started my collection. When I was in high school, a friend got a double bass drum set of Ludwigs in this finish. When I saw those brand new Psychedelic red drums I couldn't believe how spectacular they looked. I never got over that, so I went looking to recapture that experience by owning a set like those. I told my good friend Bill Pace, who actually had a vintage drum store at that time, to let me know if he found a set I could buy. He called me one afternoon with the news that he had a set in his store if I wanted to see them. I took my son with me to share the excitement. We bought them and I have certainly enjoyed owning them ever since. They are not perfect, as I said, but if you get a chance to buy a set like this in almost any condition you should do it. The finish fades with time and light exposure. The green color is the first to go. Even faded they are still desirable.
I don't know if this will make the editors cut or not, but I also included a picture of a Ludwig factory Psychedelic wood shell Supraphonic re-issue snare drum Ludwig made for me just before they re-issued the color on sets fifteen years ago. I along with others had requested Ludwig re-issue the finish, and so I got one of if not the first one. The head was signed by Bill Pace who sold me the original kit and by the "Chief" Mr. Bill Ludwig.
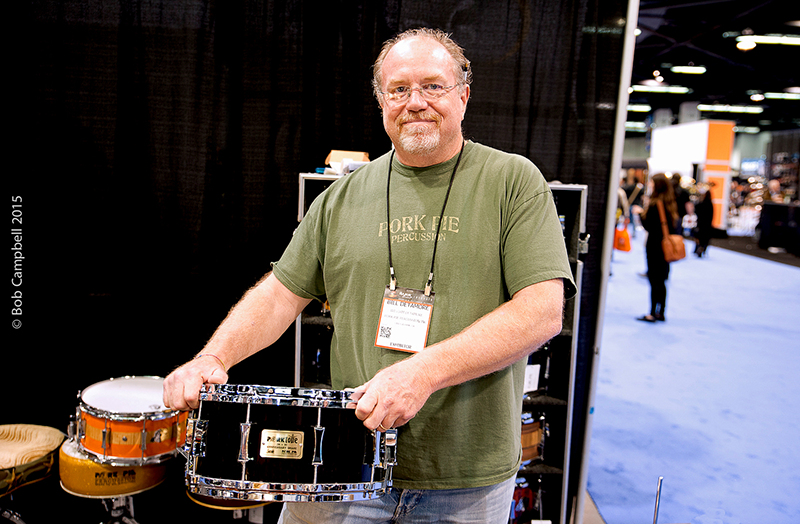
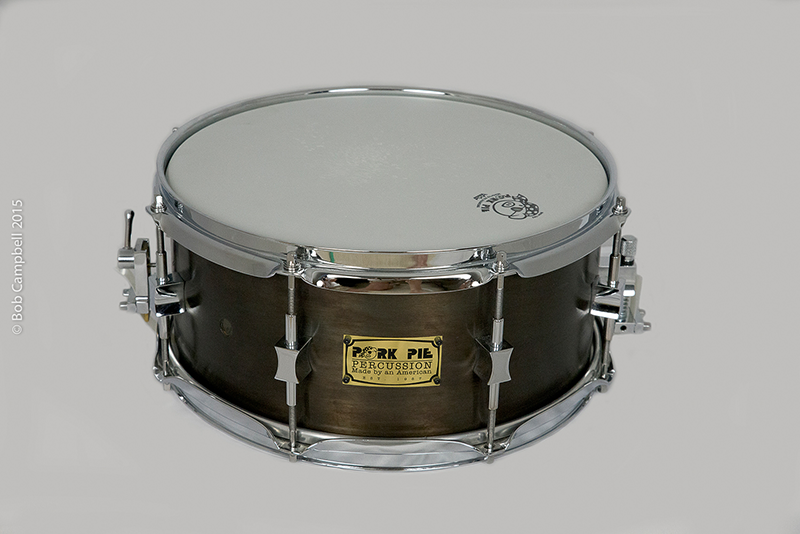
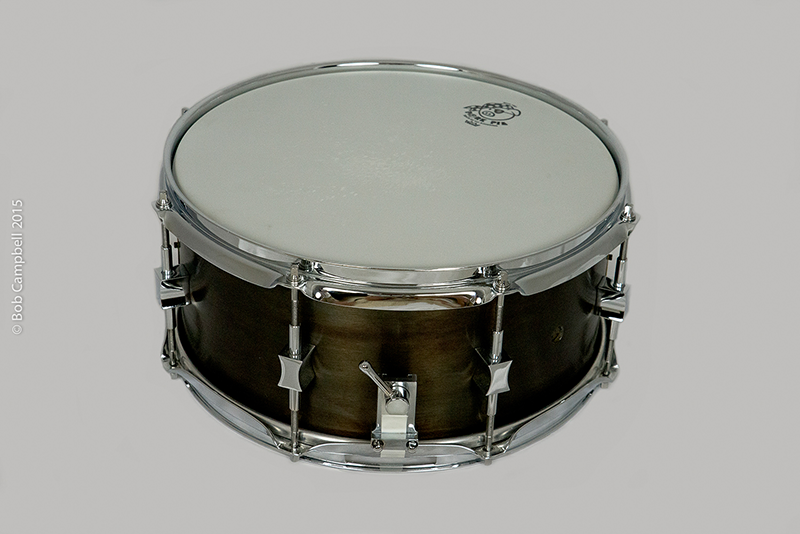
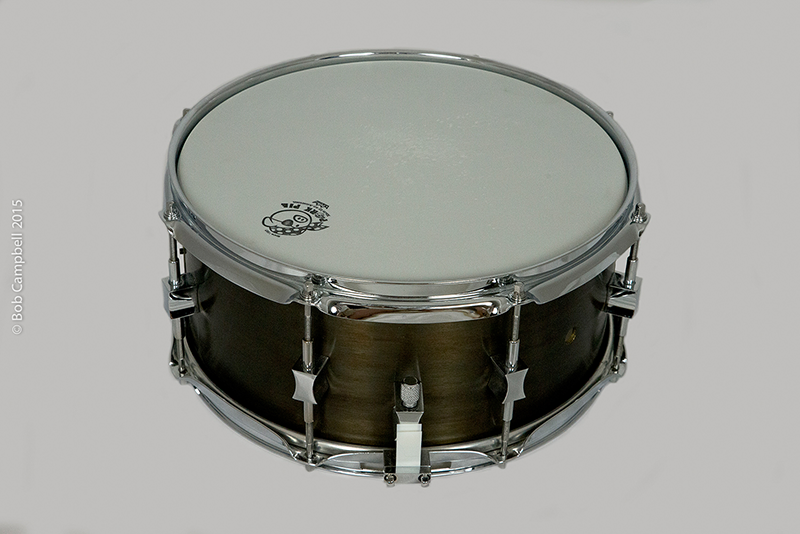
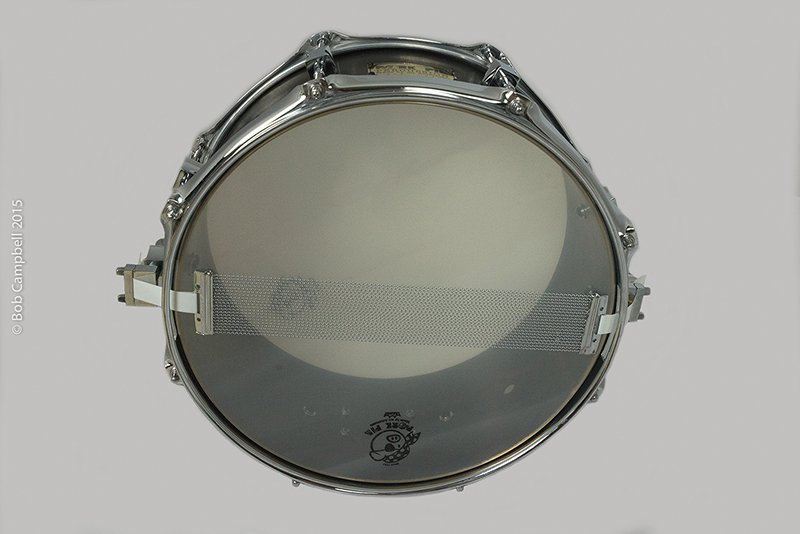
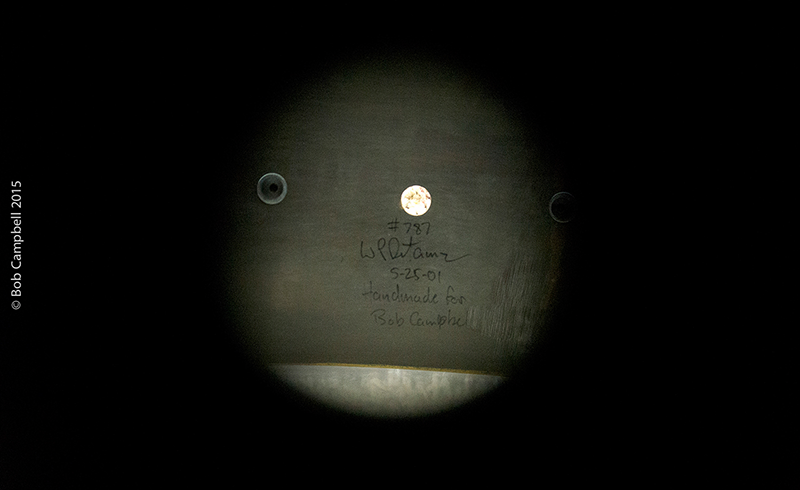
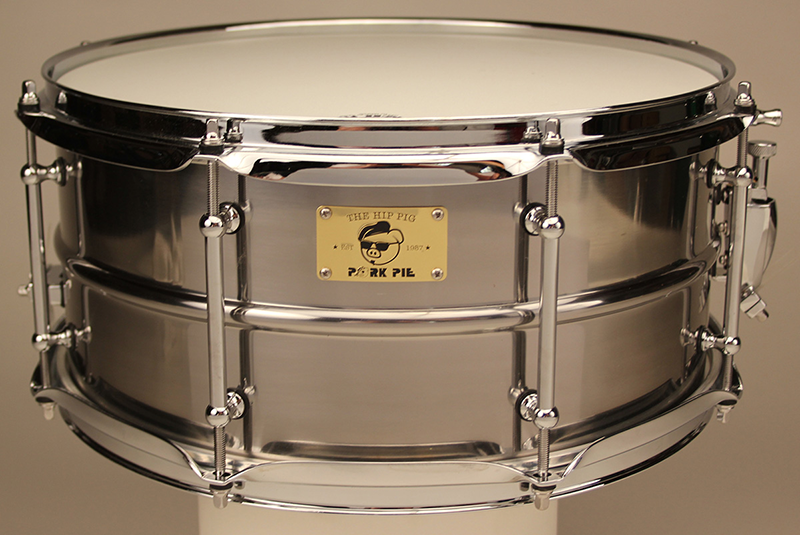
A Brief History of Pork Pie Percussion & My Limited, Heavy Brass “Porkster” 6.5 X 13” Snare Drum


By Bob Campbell, with Bill Detamore
Around 15 years ago, I had the great pleasure of meeting Bill Detamore, owner/founder of Pork Pie Percussion. I was immediately struck by his intense passion for building drums, pragmatic approaches and fun sense of humor. He was a drummer who started out in the aerospace industry and circled back to what he loved best – making drums. Shortly after we met, Bill told me about a limited series of snare drums he was making out of heavy brass, and using solid brass lugs and throw-off that he designed himself. He was kind enough to send me one to try out – a 6.5 X 13” snare, an unusual size for that time. It had a dull, uniform patina finish with 8 small angular, chrome-plated, hourglass-shaped lugs, and a cool chrome-plated throw-off with a small baseball bat-like lever. The snares were actually tensioned from the butt-plate side. I played it for some time, really enjoying it’s unique character. It was very sensitive and uniform sounding from the edge all the way to center. I expected it to be rather loud, compressed and dull given the weight (this puppy was heavy, although lighter than a Paiste/Ocheltree Spirit of 2002 which would appear a year later). To my surprise, it was quite lively with a very appealing over-ring. It was one of those drums that I knew would sound great unmuffled when needed to cut through the mix, but also fit in nicely with a little Moongel™ for less of an upfront, in-your-face kind of sound. I loved it and ordered a 6 X 13”. My limited, heavy brass Pork Pie “Porkster” was made in May, 2001 (#787, i.e., his 787th drum ever built). Fourteen years later, I still have this drum and only now realize how truly special it really is… However, the story is not just about this very cool drum but about the guy who built it – the guy with all the passion and creativity – Bill Detamore. So I’d like for you to get to know Bill through an interview I did recently and hopefully understand what has kept me so interested in Pork Pie over the years.

Where did your interest in drum construction begin? [Bill] “I started around 1982-83. I was building drums just for myself; nothing was done for customers. It was just me basically learning how drums worked – buy a drum, take it apart, learn how to change it, fix it… At that time, the only place you could get any real information on drums was through Modern Drummer magazine. I would read articles about drum techs like Paul Jamieson - what he said he would do with Jeff Porcaro’s drums; and Pat Foley, he was doing a lot of customization at that time here in L.A. I would read about what they were doing and try to emulate it. I just listened, read and jumped in with both feet. I started buying old drums, mostly snare drums, that I found in a local L.A. paper, the Recycler. For example, if I read in Modern Drummer about packing lugs with felt so you wouldn’t hear the springs rattle, I would tear it part and do that. I’d also clean all the hardware, replace screws, refinish it if needed, learn how fix or replace any broken parts, then put it back together and sell it.”
How did this interest progress to actually building drums? [Bill] “In the back of Modern Drummer (around 1985-86), there was a small ad from the Corder Drum Company for a snare drum kit. This was basically all the parts to put a drum together – shell, lugs, throw-off… basically what Precision is doing now. I didn’t like the Fibes throw-offs with the big handle that came with the Corder kit, so I would add a Ludwig P-85. My father taught me how to shoot lacquer, so I was able to do the finish; then I taught myself how to cut bearing edges. I learned what snare beds are, how they work, and why a snare drum needs them. So I put it all together with the P-85, my beds and my finish, and sold it. I first bought two of these Corder kits, then I bought four, and then started buying shells from Keller. It kind of grew from there.
Now I had been working at Rocketdyne in L.A for 5 years, a company that made the main engines for the space shuttle. I really didn’t like the job so I was looking for anything that was a release from working there. To be clear, when I started Pork Pie, there was never a thought that I would able to one day making a living out of it. I went and got my business license, checking account with the business on it, and started to do little jobs for people. It got more and more busy over time. In late 1987, I received a call from John Good at D.W. saying they were getting ready for the NAMM show but unexpectedly were short-staffed and needed some help. He had to get all his stuff finished so they could take it to the trade show. I had a lot of vacation time, so I took that along with Christmas vacation, and spent about 4 weeks helping them get ready for the NAMM show. After the NAMM show, I started working for D.W. part-time. At the end of each day, I would leave Rocketdyne, drive out to D.W., and work 3-4 hours. Then I would come home and work on my own stuff. It got to the point where I just couldn’t function any more. I was just tired all the time. So I went to John (Good) and said, “Here’s the deal. I’m doing all this stuff and I can’t do it anymore. You need to make a decision; are you going to hire me or I have to go, one of the two.” So he said, “Let me talk to Don.” So they talked and decided to make me an offer to work full-time. I was thinking, “Thank God – now I can quit working at Rocketdyne finally.” So I worked there a painter; all I did was paint. I lasted around one year. I remember the moment I decided to quit and do this (Pork Pie) full-time. It was a Sunday in early June, 1989. I called my mother and said, “I just want to let you know. I’m going to quit my job tomorrow.” You could hear the panic in her voice as she said, “Oh my – are you going to be able to do it?” I said, “I have no idea, but if I’m going to do this, now is the best time.” I didn’t have a girlfriend at the time, my car was paid off; I had only rent and a dog to feed – these were my only bills. I figured if I was going to do this, it was the best time.
This leads to a really funny story (although maybe not so at the time). For my very first job being self-employed, a guy named Jim Carnelli brought me a brand new 5 X 14” Noble & Cooley snare drum in black lacquer to do edges on it. He was in the garage watching me work; it was really hot. I’m cutting the edges on my little router table and my hand was sweating from the heat. Somehow that brand new, solid, one-piece maple shell slipped right out of my hand right onto the router blade, taking a huge chunk out of the edge. So I’m thinking, “This is how it starts. You become self-employed and you screw something up on your first day.” I turned the router off, explained what happened to Jim and showed him the chunk missing out of the edge. Jim looked at it and said, “So – what do we do?” I said, “It looks like I’m buying you a new drum.” So on the first day I was self-employed, I had to buy a new Noble & Cooley snare drum to replace the one I messed up. Later, I took the drum I screwed up to a machinist; we squared off the area that had the big chink missing out of it, made a plug of maple and glued it in place. I let it sit for a few days, filed it close and then re-cut the edges. Mike Fasano has this drum and it’s one of the drums he rents out all the time.”
How did you come up with the name “Pork Pie Percussion”? [Bill] “My friend Mark and I were sitting at my house, and we were trying to think of a good name for a drum company. We had been sitting at my house, watching this movie from New Zealand called “Goodbye Pork Pie” and I just said, “What do you think of Pork Pie Percussion?” Mark goes, “It’s great!” It was right up his alley; he’s a nutty, super-creative kind of guy. That was it – a consensus of two!”
Tell me a little about the drums that Pork Pie Percussion makes? [Bill] “In the beginning, it was mostly maple because that was all you could get from Keller; that was all they made. There was Jasper (maple/gum ply shells) but their minimums were too high. It’s always been hard to get birch shells from Keller. At the time, there were three of us making custom drums: myself, GMS and Joe Montineri. Joe did get one run of shells from Jasper but it was really only Keller at the time. Later, some guys came out of the woodwork and starting making solid, one-ply shells. I got some shells from a guy in Connecticut, Glen (Paquette?). If I remember correctly, I got some oak and ash shells from him. For a while, I got some stave shells from Greg Gaylord, before he started working for Craviotto. We had a deal where, for every shell he would supply me, I would finish a shell for him. Just a couple of years ago, I started getting shells from Carerra in the U.K. I was getting walnut and mahogany and all kinds of different shells from him. Around that time, I started making the wood/brass shells that now everyone seems to like so much. The sad thing is that Carrera are closing their doors (Note: March 31, 2015; just two days after this interview). Dave Carrera has got a really bad lung condition. Fortunately, all of the tools and molds were purchased by North Custom Drums. One of the guys who used to work at Carrera is now working for North, so they haven’t missed a beat.
But in the early days, we had to be very creative. When I started to make 10” snare drums, there were no suppliers of 10” snare side hoops. Everybody takes that for granted now. There were no 10” snare wires either. For my first 10” snare drums, I drilled holes in a snare side hoop with my drill press, so I could have a gate for the snare strap to go through, and hand file the whole gate down. That’s what we had to do back then. After that, I had a machinist cut out a slot in the hoop for the gate. For the 10” snare wires, I had to take 14” wires and cut them down. Sometimes re-soldering didn’t work well because of the chrome plating so I would use epoxy to hold the snare wires in place.”
You’ve also made a series of metal shell drums – could you tell me more about these? [Bill] “The shells for the first Pork Pie metal drums were made by a friend, Larry Gill. I haven’t seen him in years. He was a metal sculptor, like sculptures for people who have way too much money (laughs). At his metal shop, I asked him if he could make some round drum shells. The first question being, “How round can you make them? It has to be pretty uniform.” Larry figured out a way to make the shells truly round and how to weld them. He was my supplier for my heavy brass shells for a while. I did do a few shells out of stainless steel, but 90% were brass. We probably only made about 30-40 shells with Larry, probably closer to 30, so they are pretty special.
After that, I started making the Big Black drum. That was the first drum I really hit big with… In the past, Guitar Center was buying some metal drums from Lee Smith (Drum Paradise). Lee was getting WorldMax shells, putting on some tube lugs, throw-off and hoops and selling to GC; but they cost a fortune. Guitar Center wanted to sell a bunch of them but Lee was pretty limited in what he could do. Jeff Lorenz (Guitar Center) called me up and said, “I’ve got this opportunity. You want to give it a shot?” I said, “Sure!” So we got everything priced out and I was able to beat his price by quite a bit. I think the first order for GC was for something like 40 of these drums. It was a pretty good order. They were selling really well. Then I found out that over in Taiwan, there was really only one company that makes brass shells for just about everybody. The company I deal with over in Taiwan, I asked them if they could get this shell (I sent them a picture) and they said, “no problem.” That’s when we started doing the Big Black, giving it a name and its own tag – that’s how the Big Black came about.
Then GC came to me and said, “We’re looking for a snare drum that looks like its been buried in the mud for 100 years – Can you do something like that?” I said, “Yes, I’ve been doing that for a long time. Some of the brass shells I did back in the day with Larry I would do a patina finish on.” I got in touch with the company in Taiwan and said, “I need these shells and I need them raw.” They said, “Ok, sure - no problem.” I got some samples sent over and then figured out how I could do the patina finish in a production mode, doing batches at a time instead of just one. I figured that out and started making the 7 X 13” patina brass snare. The first order for these from GC was for 400 of them. To date, we have probably made close to 10,000 patina brass and 18,000 Big Black snare drums. It’s kind of like our Pork Pie thrones. I keep saying every year when I see how many we ship, “one day we are going to run out of butts in the world.”
In 2001, we met and had a great discussion about drums. I wound up buying a 6 X 13” limited production, heavy brass Pork Pie snare drum (inside the shell, dated May 25, 2001; #787). Can you tell me more about these brass drums? [Bill] “That particular drum was one of the limited shells made by Larry. The shell is a 1/8” brass plate that’s rolled and welded. At that time (2001), there was no WorldMax where you could go and get shells. If you wanted these heavy brass shells, you had to figure out how to make it. You couldn’t go out someplace and buy a brass shell. If we made a thin wall brass shell, say around 1mm thickness like a brass Supra or WorldMax shell, we’d need the tooling to bend over the edges – this is what keeps those shells round. Tooling for something like that was a huge amount of money. Larry’s thicker shell gave it stability, keeping it round without the special tooling. It wound up sounding great. The way I cut the bearing edges and put my snare beds in. I had a Makita grinder to get the snare beds close to where I wanted them and then I used a hand file to get them the rest of the way. It’s a lot of work. First, I get the contour the way I like it, then round it over and finish it by sanding it by hand. Sanding brass is not easy. For my early drums like this, I designed my own (hourglass-shaped) lugs that were made out of solid brass and my own throw-off (with small baseball bat arm attached to a cylinder) and butt plate, which were also solid brass. Later, when I got to making production drums, the cost was just way too high at that scale. For example, by the time I had the lugs buffed and chrome-plated, my cost in just one lug was $10; the throw-off and butt plate was around $80 – and that was back around 1995-2000! So I decided to go the direction of cast lugs for mass production. I do have a couple of the lugs and throw-offs left in my shop but I couldn’t imagine what the price would be now because of the cost of raw materials rising so much over the last 10 years. Even so, I don’t know of any machinist who could keep up with the numbers we do now.
Of the heavy brass snares, I made one 3 X 13”, a couple of 4 X 13” and 4 X 14”, bunch of 5 X 14” and 6 X 14”, a couple of 5 X 13” and 6.5 X 13”, and one or two 7 X 14”. We also made a couple of 10” snares, and some 12” including one run of stainless steel (12”, 13” and some 14”). That was the only time we did stainless steel because drilling 1/8” plate stainless steel was almost impossible; we were snapping drill bits. I remember we did one 5 X 14” bronze shell.
I started making these brass drums for guys around town. Matt Sorum has a couple of them. He used to buy snare drums all the time from me. I know Duff McKeagan (bass, Guns N’ Roses) has one in his studio; I believe Slash has one in his studio, and Mike Fasano (drummer for Warrant, Don Felder, Tiger Army and Gilby Clarke) has a couple that he rents out. Mike Bordin (drummer, Faith No More) - I think we made him 2-3 of these brass drums. He used one of these in the studio and loved it. He ordered one for the road and one he could have in his trunk as a back-up. I happen to have brass drum #1 at my place, a 6.5 X 13”. They started being used on records here in L.A. Back at that time, it was easy to go down to a recording studio with 10 snare drums, like when Guns n’ Roses were around, have Matt play them when they were recording. What better way to hear how a drum sounds than having Matt Sorum play it and Mike Clink producing?”
What’s your personal favorite snare drum? [Bill] “I always loved solid shells. One of my personal favorites is a solid, steam-bent oak, 7 X14”. I gigged for years and years with it. I’m a meathead rock player. I used to be such a knucklehead for Radio Kings; that’s what I had mostly in my snare drum collection. Those drums had a 60-degree inside edge on them. That’s why I do all of my solid drums with a 60-degree edge on the inside and a round-over counter-cut on the outside. They sound fabulous.”
Any new snare drums from Pork Pie for 2015? [Bill] “One of the drums we introduced at NAMM was the Porktone snare, which is a bell brass shell, 1/8” thick, and limited release (25) in only 6.5 X 14” size. They come in a brushed finish or custom high gloss lacquer over the top. This drum is a combination anniversary celebration for Pork Pie (28th Anniversary) and Soultone cymbals (10th Anniversary). On the badge, it says, “28 – 10 Anniversary snare”. I’ve been doing business with Iki Levy from Soultone cymbals since before he started Soultone cymbals, when he had a drum store. We thought, “How cool would it be if we made a snare drum together?” At first, we tried to make a drum shell out of cymbal material. We had a mold made over in Turkey. They were trying to make us a shell but they ended up being very brittle; that was a no-go. So we wound up getting a cast brass shell from Taiwan.
Another drum we have coming out around the end of July, early August, is the new Pig Iron 6.5 X 14”, 8-tube lug snare, and as the name states, the shell is made out of iron. The shell is thin-walled, rolled and welded, with a bead in the middle. It has a folded over bearing edge with rolled in snare beds. It looks like a Black Beauty snare drum shell but made out of iron. I’m doing them in two finishes: one is raw, polished iron and the other is a stain finish plated in tin. Both are clear-coated with lacquer so they don’t rust. I’m really excited about these. My favorite is the polished shell because it looks like it’s polished graphite. It’s really, really cool. These snares have the attack and body of a steel-shelled drum, but then it’s got the dryness of an aluminum drum.”
With regard to your drums, what has been your career goal? [Bill] “Honestly, I wanted to make drums that somebody would go into a pawn shop or vintage drum store 50 years from now, find something that I made and say, “Hey, these are really cool! This guy made great stuff back in the day.” Like you or me going into one of these places and finding a chrome over brass snare drum the 50’s - that same type of feeling.”
It’s been a pleasure to get to know Bill better over the years and share our love of drums. He seemed quite pleased and honored to know that I still have and treasure my Pork Pie brass drum purchased so long ago. I do think it will be one of those prized and collectable snares 50 years from now. Perhaps it will be some drummer’s great find and they’ll ask – “Who built this amazing brass snare drum? I think these are pretty rare!” Hopefully, they’ll look in the Not So Modern Drummer archives and enjoy learning about an exciting chapter in our drum history; the story of the great Bill Detamore and Pork Pie Percussion. And somewhere, Bill Detamore will be smiling…
1947-50 METJAZZ Snare Drum
Here’s the latest snare drum to enter the collection. I got this drum from Emmanuel Giraudon who owns Oldrums in France (www.oldrums.fr).
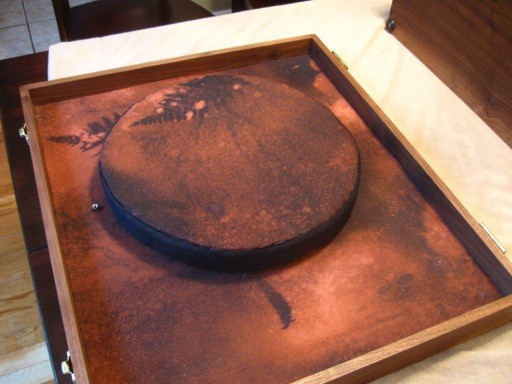
Read moreBuilding a Stanbridge/Sucherman Empyrean Snare Drum: The Director’s Cut
By Bob Campbell, with Pete Stanbridge and Todd Sucherman
As a collector and player of custom and vintage snare drums, I’m always on the lookout for a drum that speaks to me in a unique way. I believe each great snare drum can evoke a different wavelength of creativity. That’s why drummers should have multiple snare drums in their arsenal (at least that’s what I tell my wife). I like to think that I’m not alone in this respect. In addition, I’ve become enamored of the whole process of drum construction and drum restoration; there is a level of artistry and perfection in the work of the master craftsman that gets my heart racing. A drum that possesses the attributes of fine construction, distinct sound and visual appeal is the best of all worlds (practicality, personality and fine art). The absolute pinnacle would be to document the entire process from conception, to build out, to my hands. This would be heavenly, or perhaps described as “empyrean” (def. “the highest heaven”).
That “ahhhhhh” (imagine angels singing) moment came to me a few years ago when I had the pleasure of chatting with Todd Sucherman after a fabulous STYX show in Indy. When we first arrived, Todd had this strange twinkle is his eye; something clearly had him excited. He waved me over and said, “Look at this!” On his cell phone was a picture of a segment shell snare made of various exotic woods, dark wood hoops and beautiful gold-plated hardware. I had never seen anything like it but it did remind me of Pete Stanbridge’s work (I have the ProMark/Stanbridge 50th Anniversary and Stanbridge Ancient Kauri snares). Indeed it was from Pete. This was a prototype for the planned Todd Sucherman signature snare drum, later to be known as the Empyrean. I felt quite privileged to get an early look, but on the condition that I keep it hush-hush until the public release. Todd described how it was intended to be the most personalized and unique drum ever made, with pictures of the construction along the way, hand-signing and testing of each drum by Todd (including a video to that effect), hand-made walnut case, several signed CD’s and DVDs (Methods & Mechanics I & II!) from Todd, and assorted “toys” made from the exotic wood offcuts. Subsequently, this started an email string between Todd, Pete and me which tells the story of how my Stanbridge/Sucherman Empyrean (#1) came to be. While I have been completely thrilled with this drum in all of its perfection, much enjoyment came from the periodic emails describing each step of the Empyrean’s construction from Pete. It was like a great story where you read each chapter, waiting for a climactic ending, but in the end, disappointed when it’s finally over. Not so much because you didn’t like the ending, but because you enjoyed the story and wanted another. So I’d like to share this “Empyrean biography” with you in hopes that there are also drum geeks in the crowd who will enjoy reading the tale as much as I did.

Introduction:
[My note to Todd] “Todd, it was great to see you in Indy last night. My wife (Helen) and I thoroughly enjoyed the show. I don't know how you play with such intensity in that heat! Musicians like yourself who despite busy tours give exceptional performances night after night always impress me… I enjoy your playing a great deal. While I will never be a drummer like you, I am inspired by your playing and always seek to improve my skills (hopefully with the help of your videos :).
Thanks for showing me the pics of your new signature snare. I will contact Pete Stanbridge today about obtaining one. Knowing your taste in drums, this design looks to be superb.
Wishing you the best.”
---------
After submitting a ton of questions to Pete Stanbridge essentially asking him to justify the cost of an Empyrean (including asking for a second top hoop, i.e., one for playing and the other for display), I received this email:
[Pete S.] “Hi Bob! Thanks very much for your thoughtful and detailed reply - we really appreciate the feedback, and your comments.
I believe that the whole nature of this offering makes it a very difficult comparison with anything that has come before. The 100+ hours I budget for each completed piece is a real number, and that doesn't include Todd's time commitment, or any of the significant material costs of creating this instrument and package.
It remains to be seen what kind of audience there is out there for this instrument. I am sure, however, that neither Todd nor I want to compromise on the package we have created, because we both feel that it really does represent excellent value, and sets a new benchmark in terms of creativity and quality in a percussion offering.

BC-0615_03
I realize that we are going to take some shots on the forums for a few days, and I have no doubt that there will be people who will become very passionate in voicing their opinions. But, I am exceedingly happy with the work, and if I ever start feeling beaten up by the forum crowd, I know that watching and hearing Todd play this drum will make me feel better.”
[Todd S.] “It's my belief that a drum of such personal detail and care has never been offered in a package so unique. The fact that it comes with a book detailing the manufacturing alone has never been offered to my knowledge. That coupled with it being sent directly to me for playing, tuning, approval, signing, and pics/video detailing that process as well is beyond what has ever been offered. Then getting tickets and backstage passes to a show…I think that takes the package over the top.
I know Pete spends 100+ hours on the drum with materials so expensive and rare that they've never donned a drum before. All these things combined... I can't see any drum out performing it, or out pricing it. Hence, the price reflects the work, materials and package.
A Bugati is a Bugati, and a Fazioli piano is a Fazioli. A Patek Phillipe is a Patek Phillipe, and this is what we set out to do, and I believe we have accomplished just that. Something unparalleled.
Thanks again for sharing your valuable thoughts with us both. It means a lot, and it's fun to have had the opportunity to share with you and only you-- our vision before it becomes reality.
Hope to see you soon, Bob!”
---------
I then decided to be the first to order an Empyrean snare drum…
[Todd S.] “Hey Bob, First off, thanks for the well wishes. My deepest thanks in trusting me along with Pete. I'm happy and proud to have you be our #1! I have no doubt you will be beyond thrilled. I just went and spent about 30 minutes playing in the studio, and on the Empy, and she sings, and has a soul. Everyone of my drummer pals that have played it just melt.
If you haven't seen clips from the new Methods & Mechanics II DVD, here are 2---I use it on the "Melodic" clip and it's of course peppered through the big trailer.
Melodic Song Form: http://www.youtube.com/watch?v=REqodfjCY8Y
14 minute performance trailer: http://www.youtube.com/watch?v=uV_hO2kZixU
Thanks, Bob…”
And so the story begins (each email will be referred to as a chapter).
Chapter 1: The Tease
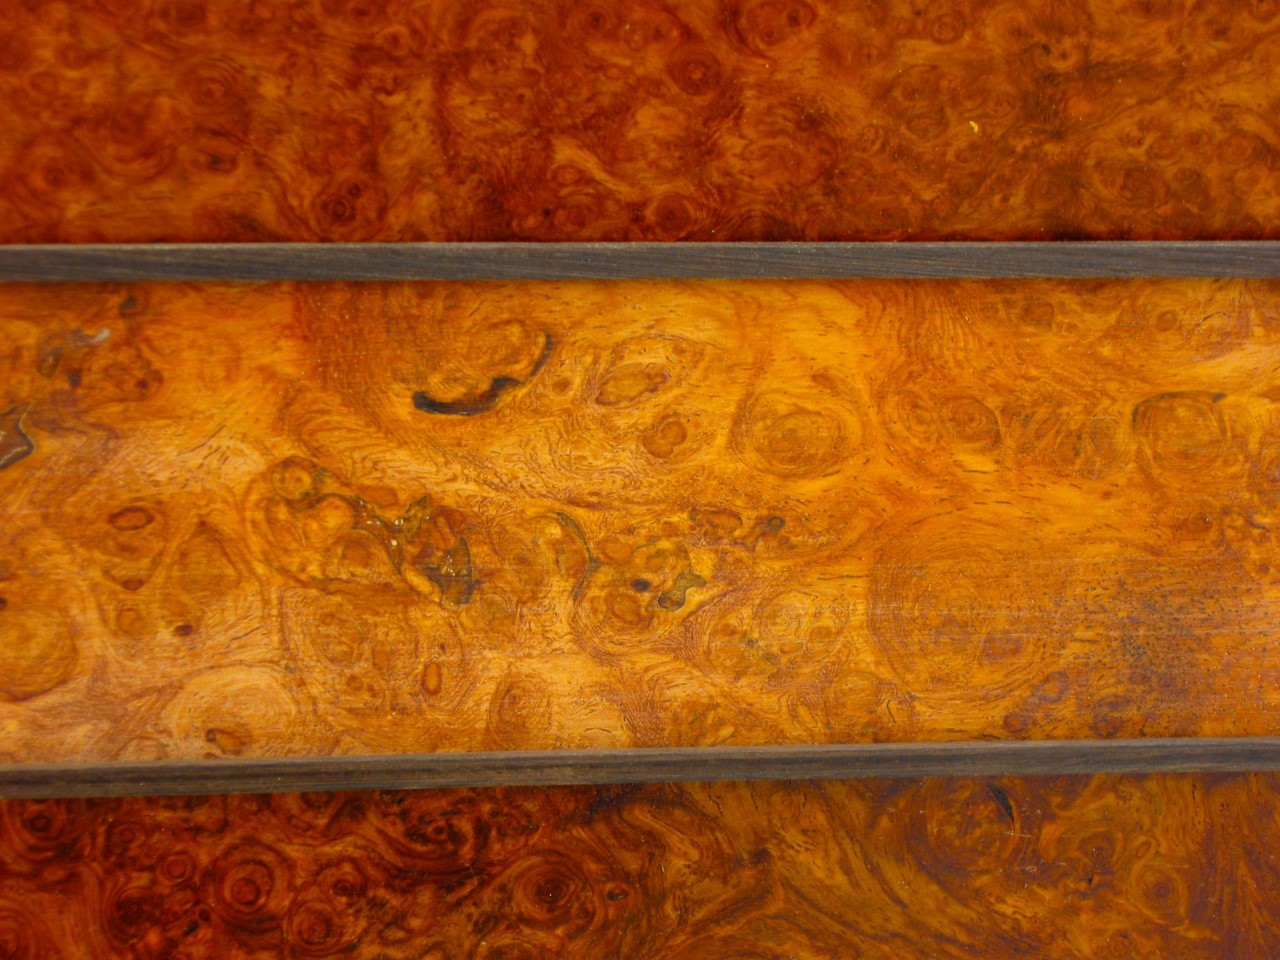
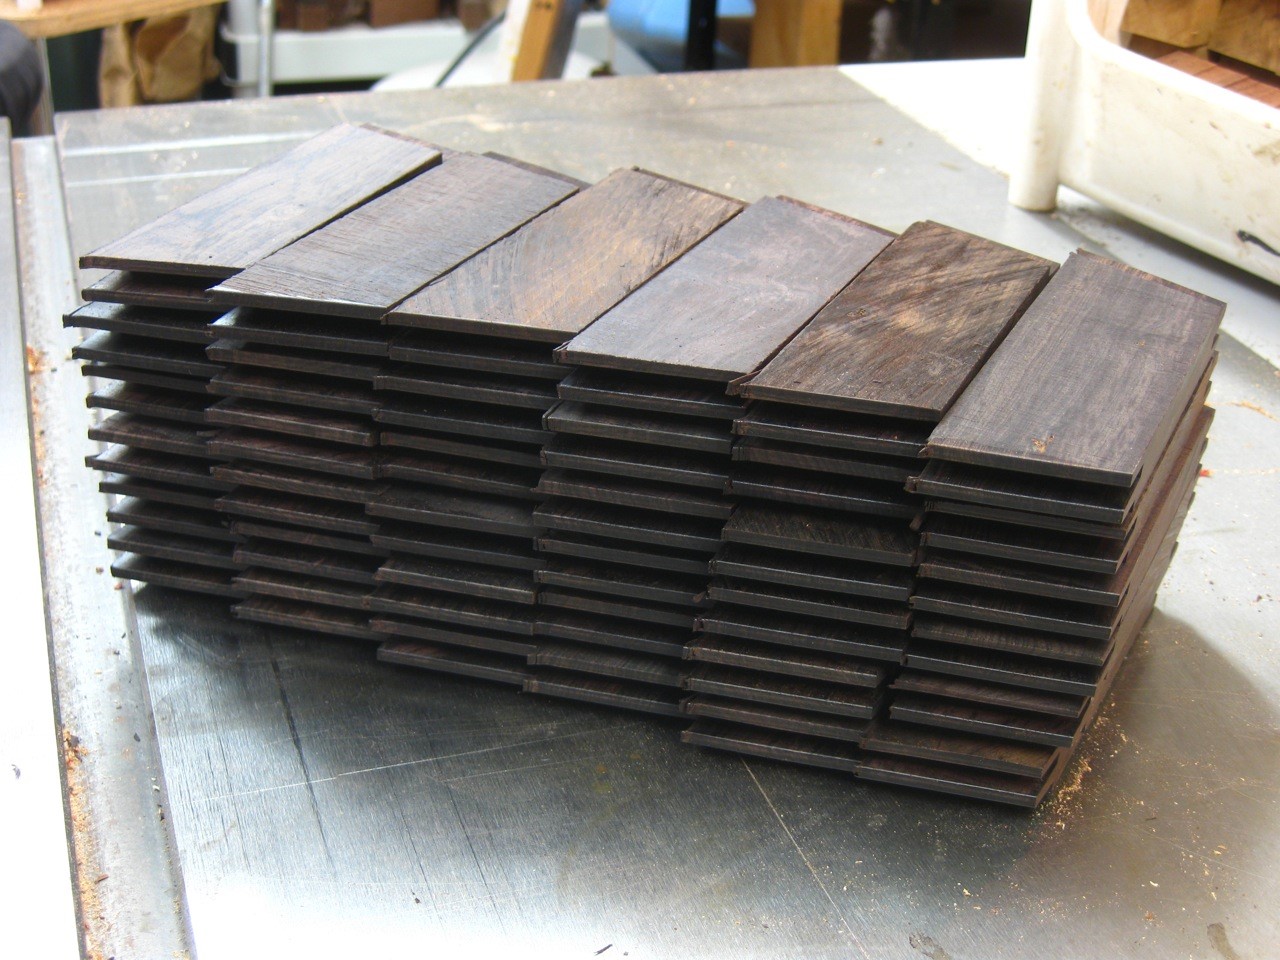
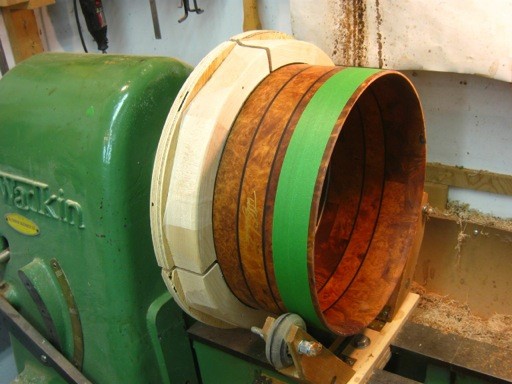
[Pete S.] “I took a few pictures of the stock for your Empyrean this afternoon, although there has not been a lot of progress beyond sourcing materials thus far. I have a few projects closing by the end of this month, and will be able to dedicate some more time to roughing out your shell blocks in order to get them down to moisture equilibrium soon. I'll shoot some more pictures of all of the wood for your instrument and send them along then. After the Christmas holidays, I will start doing some very gentle microwave drying to stabilize the burl segments, and then I would anticipate beginning construction in earnest in the Spring. I am budgeting one full month of shop time for your drum and accoutrements, although if I need more time then I will take it to make this one perfect.
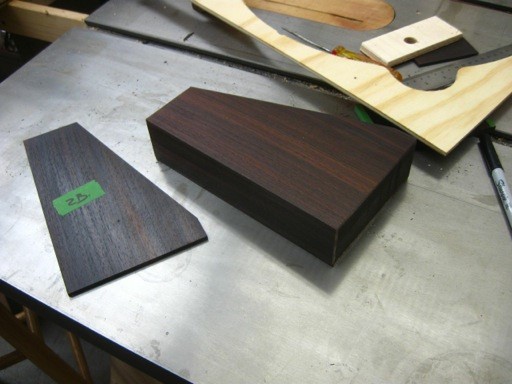
For now, I thought you might enjoy a mock-up of the basic shell design patterned on Todd's drum, as well as a detail which illustrates the difference between the Amboyna and Afzelia burl eyes (and color). I don't know about you, but this stock gives me chills up and down my spine.”
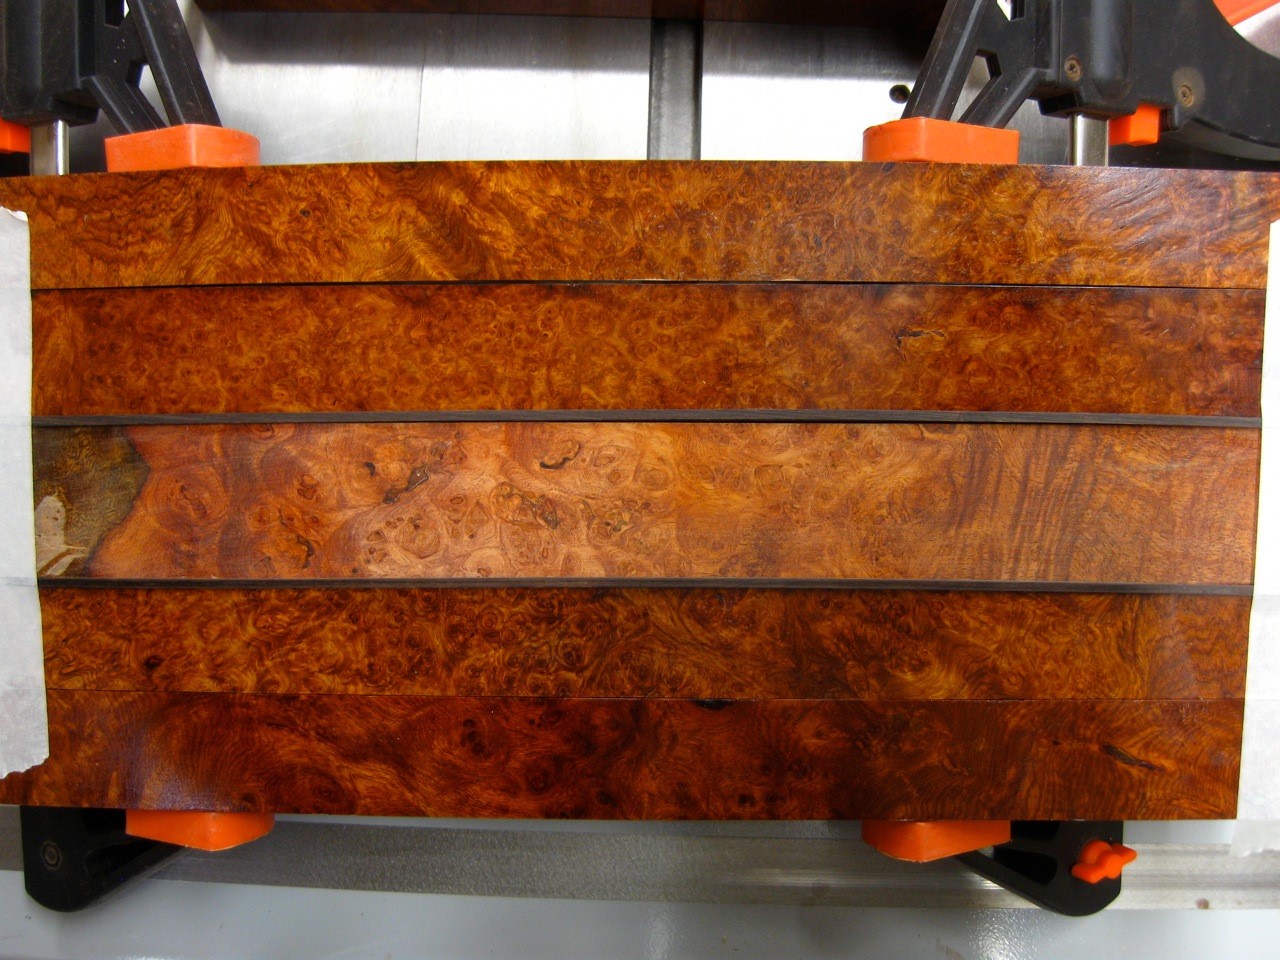
BC-0615_05
Chapter 2: As the Drum Turns
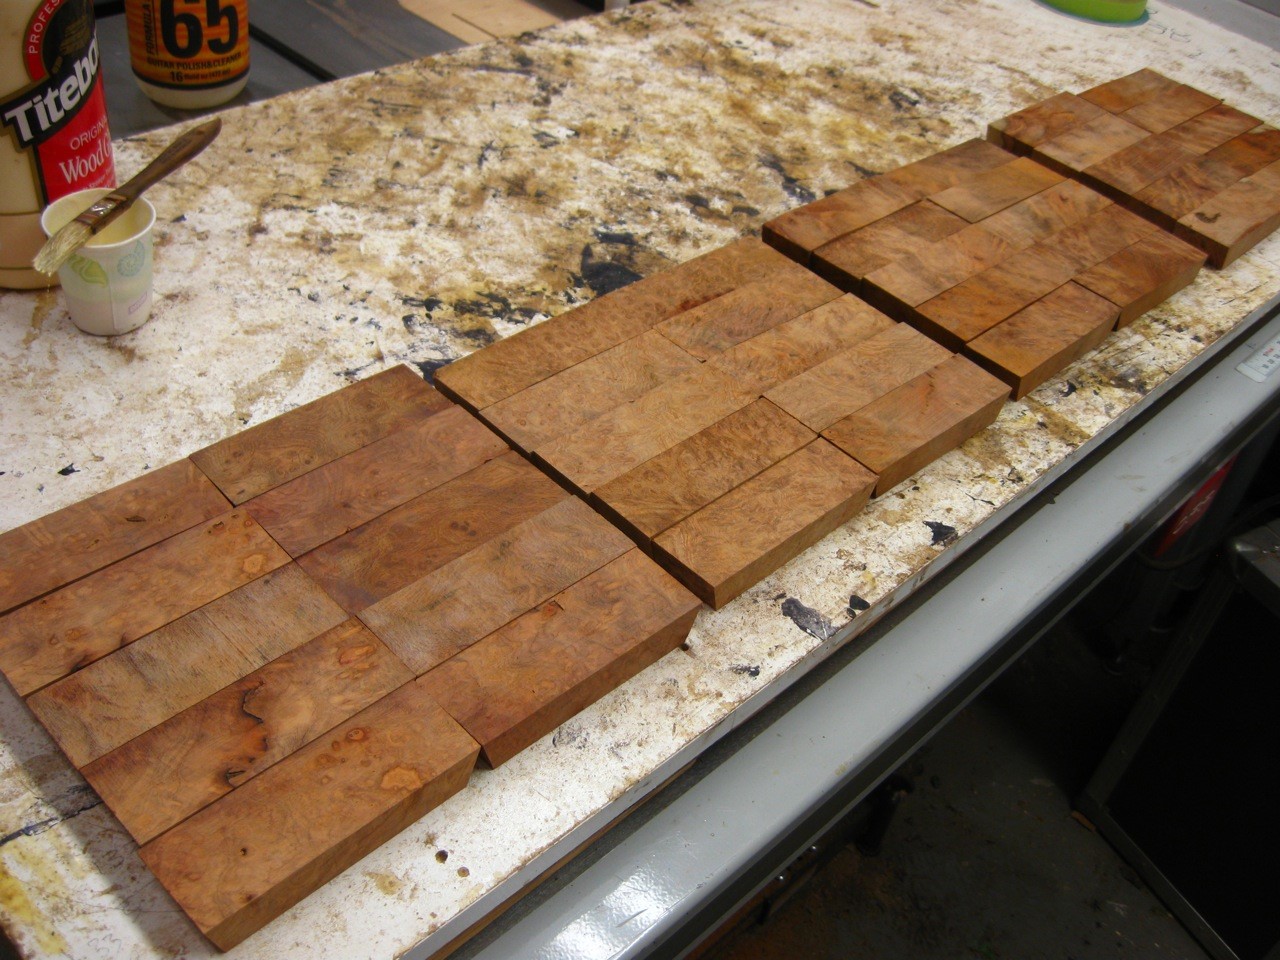
[Pete S.] “Hi Bob - Hope you have been having a great summer, and that all is well with you and your family.
As we approach the one-year anniversary of the Empy project, I thought it was high time for an update of your drum. The pictures below illustrate some of the progress to date.
As I may have mentioned earlier, one of the most ticklish aspects of working with this wood is its varying density, which makes drying it without cracking and checking difficult and time consuming. I have had your wood wrapped in brown paper for many months (the paper mitigates the speed at which moisture can leave the wood cells), but in order to make sure that we have reached moisture equilibrium, I prefer to use a microwave drying technique. I stack up the rough cut blocks with small oak stickers between them, and then run each package through the microwave on a very low power cycle a few times each day for about a month. As the water leaves the wood cells, the weight of the package decreases, and when it beings to rebound quickly (within a day or two) I know that we have achieved equilibrium with the surrounding air. If there are no checks present at this stage it is very unlikely the piece will ever develop them.

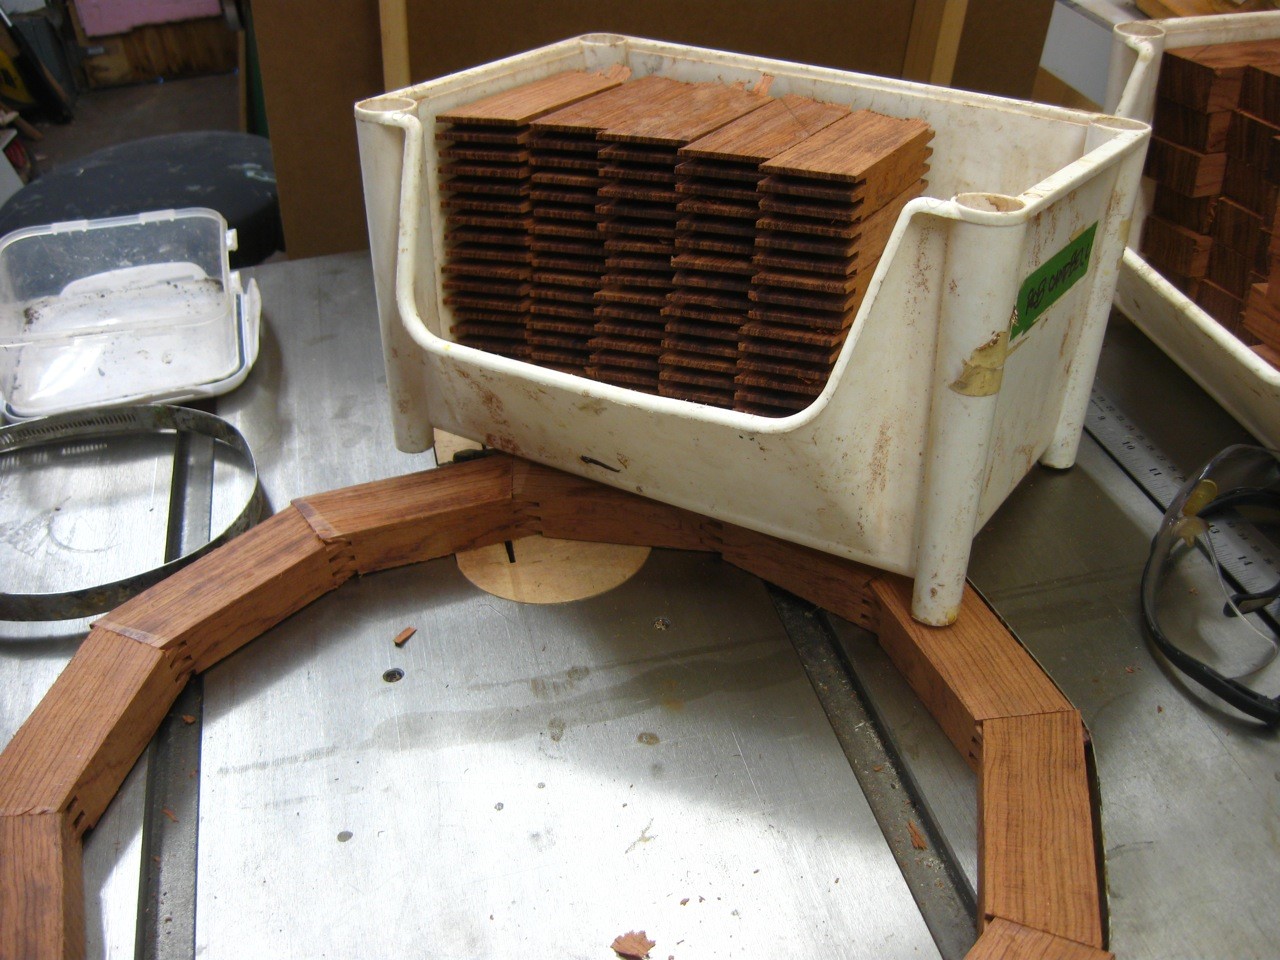
I also measured an overall weight for just the drum shell wood just so that we can track the amount which ends up as waste through offcuts and shavings.


In image 5485 you can see just how little wood remains as offcuts after the mitering process, although to be fair this does not include the initial rough cutting of the material as it came in from the supplier. With wood this dear, I keep every singles scrap though, and much of it will reappear in some other form later in the project.

I have included a couple of beauty shots to give you an idea of the massive amount of figure in these blocks - every single one has burl eyes and grain swirl in it, and the interlocking effects take on a much more dazzling 3D sort of effect once the shells is turned on the lathe.
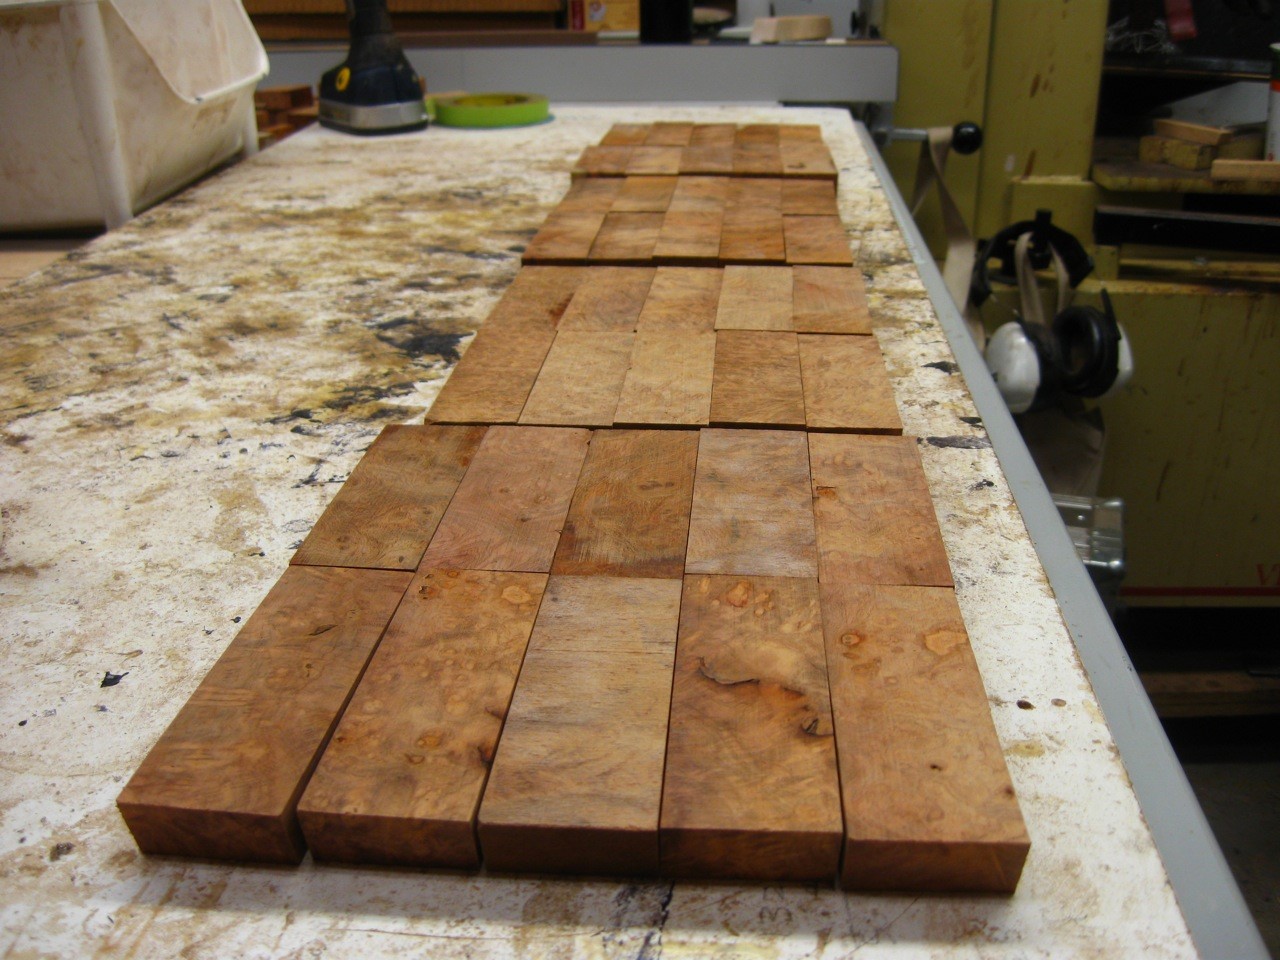
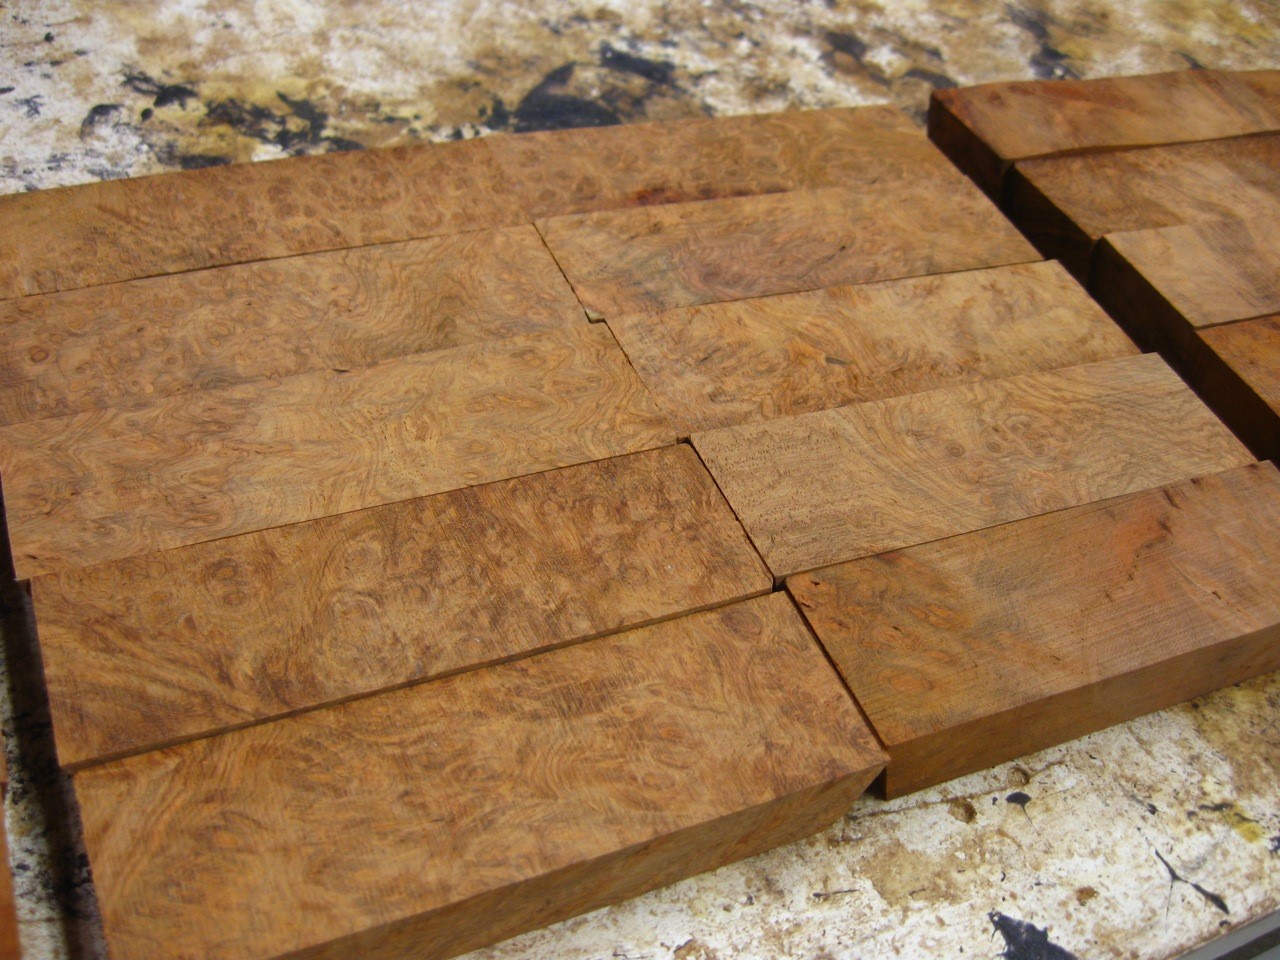
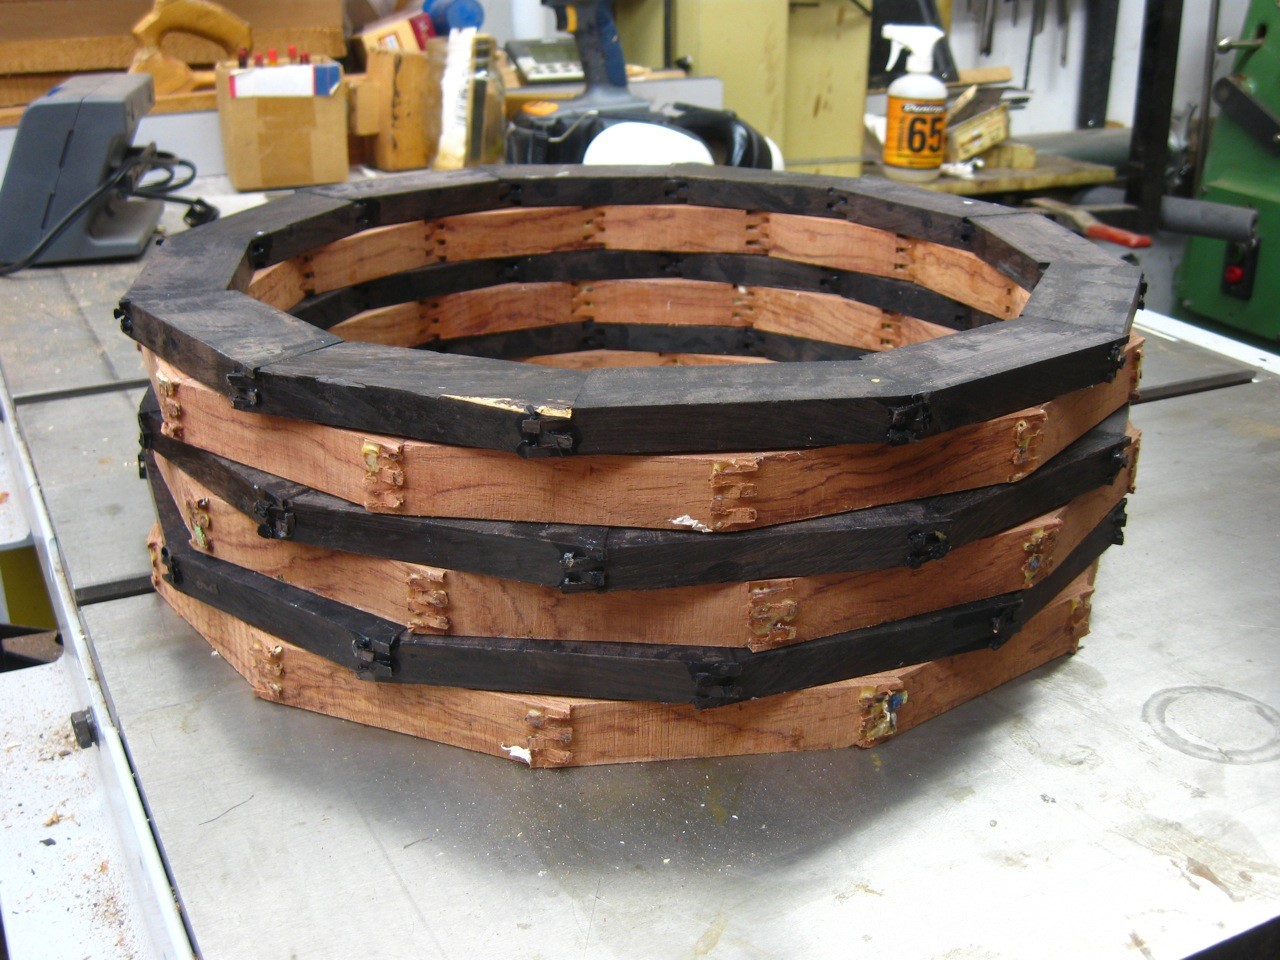
Finally, we have a shot with the rings glued up and under clamp pressure, and then after the clamps are removed. Although there doesn't appear to be a lot of colour contrast between the Amboyna Burl rings (1, 2, 4 & 5 from bottom) and the Afzelia Burl, once the finish starts to take hold, it should become much more apparent. I spent a lot of time making sure that the joinery for these rings was first class, and the seams are as fine as I can make them.
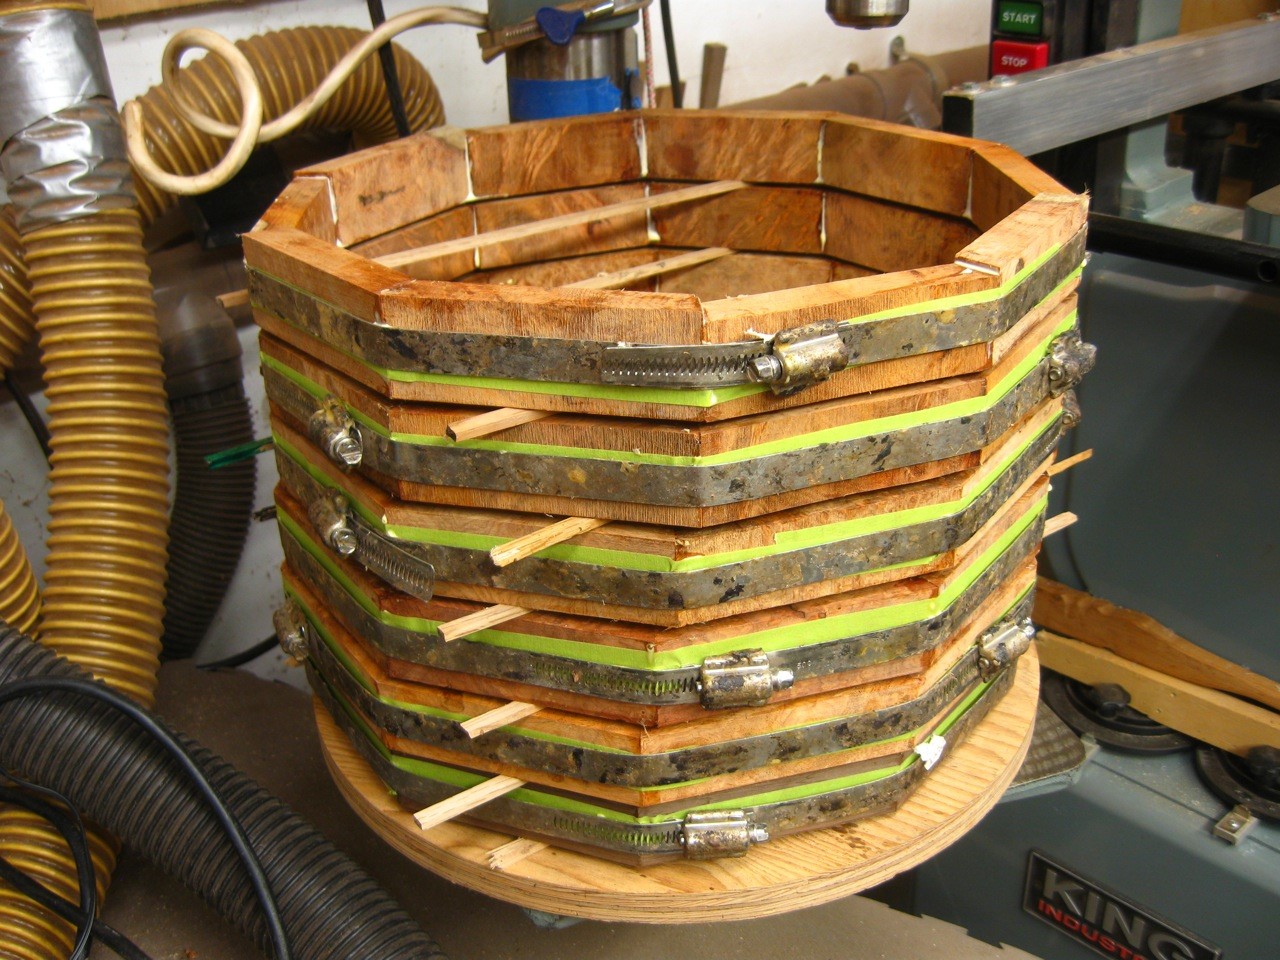

The next step is to leave the rings for a few more days, and then flatten them and glue them into the shell blank form, with a faceplate and sacrificial maple ring on one end. I will take lots of photos as we proceed, and now that things are rolling you can expect far more frequent updates.
More soon, Bob - all the best…”
Chapter 3: So Far, So Good
[Pete S.] “Things are good on my end, and I will have another Empy photo update for you in a week or so, but there have been no drying or checking issues with your shell or hoops, and the figure and colours in this drum are going to be really spectacular. I have been using some of the shell offcuts for handles and other elements of your accessories kit, and there are a couple of items that will definitely be one-offs due to the time and complexity of their design. I will shoot a few pictures of that stuff too, although I don't want to give away all of the juice in advance.
All best Bob - photos and commentary will be in your inbox by next Friday.”
Chapter 4: Wood Blocks are not Just for Kids
[Pete S.] “Hi Bob; Congratulations on the Ludwig Triumphal score (note: I had recently purchased a 4 X 14 Ludwig Wild Rose Triumphal from Bun E Carlos) - I know you play your pieces, but you must be spending lots of time just staring at this one too I bet. I would love to come and ogle your collection at some point - probably not in the cards for this year, but I do want to make a junket some time soon.
For the past while I have been working on your hoops, case and throw-off. I am really enjoying spending the time to make every part of this instrument special, and to make sure that I do justice to you, Todd, and the supremely exotic materials. Sorry if that sounds precious.
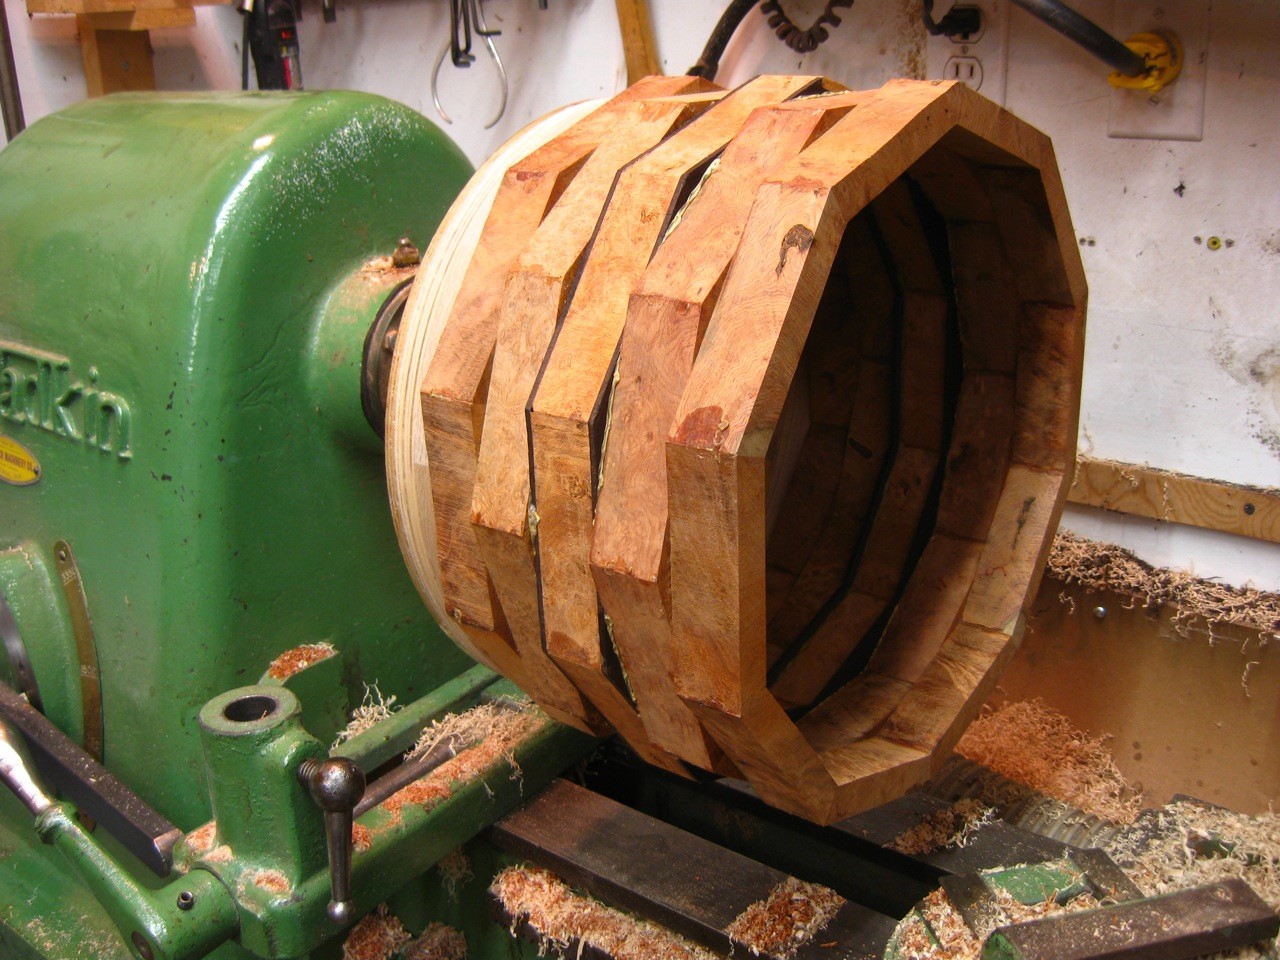
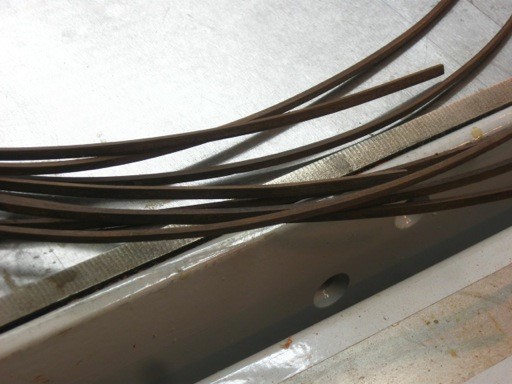
As I got to thinking about it, I realized that with this drum it only makes sense to include a 'Players Hoop' right from the outset. I did think about having it follow along in a separate carton, but then that didn't seem very Empyrean, so I have redrawn the case so that I can squeeze it in there (I hope). As you will see from the photos following, I am building three hoops for each drum, with each hoop consisting of 25 individual pieces of wood (12 finger-jointed Bubinga blocks, 12 finger-jointed African Blackwood blocks, and one solid inlay stripe of hot iron bent Blackwood). By contrast, most of the hoops I build would use just 10 blocks.
Anyway, here are some photos of your hoops in progress with a little descriptive text below...
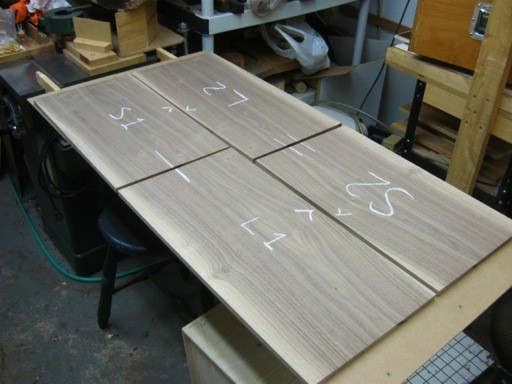
6055 - One dandy plank of perfectly seasoned quarter-sawn African Bubinga with a nice Beeswing pattern.

6057 - I cut the plank down into 1.5” strips and then split each of these down the middle to provide a book-matched set of hoop segments. Not a whole lot of this material will show in the finished hoop, but I want to make what is visible as interesting as possible.

6060 - Hoop segments cut to size and resting prior to finger-jointing. Hope you don't mind that I called you Rob - I actually started writing Robert but remembered that you used to only hear that when you were in trouble with your Mom. Notice how vertical the grain is running in this wood - this is called quarter-sawn stock, which contributes greatly to the stiffness and durability of the hoops.

6065 - Badass joinery being dry fitted with the balance of your Bubinga hoop blocks looking on.
6070 - I generally use a number 2 grade African Blackwood for my projects and cut around flaws and checks. With the Empys I sought out a beautiful premium grade Blackwood which has almost zero defects and a much more consistent color and grain pattern than the stock I am used to. Here I am re-sawing a block for your hoop blanks using a couple of gnarly old push sticks on the band saw. You can see from the scars their necessity.

6083 – Finger-jointed and ready for the big glue-up. I love working with this material - African Blackwood fills my shop with the most amazing sweet Rose-like scent.
6102 - Blackwood and Bubinga hoop rings glued up and ready to be flattened, sanded and then glued together in pairs. As an added precaution against potential woes in the distant future, I am using an epoxy to bond these layers together, so I need to get them lined up properly the first time or it is all over.
More to follow very soon Bob!”
Chapter 5: One Piece at a Time
[Pete S.] “Hope you are doing well. Here are some more photos of your drum in progress.
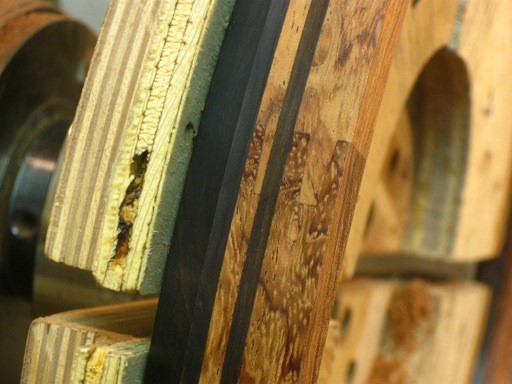
5594 - For most of my drums, I will use a thin strip of wood inlaid into the outer shell surface if I want a contrast stripe. With the Empy’s, that seemed like cheating, so the stripes are made of solid African Blackwood which go completely through the shell. This is a lot more work though. Here are the Blackwood shorts being sanded to precise thickness.

5598 - the center section of Afzelia Burl has been flattened and sanded top and bottom, and the Blackwood segments are glued and clamped in place individually.

5603 - More Blackwood segments glued in place. The nice thing about doing these one-half at a time is that I can 'tune' the final block to fit perfectly with no gaps at all. The downside is - it takes a whole lot of time!

BC-0615_24
5612 - Rings 1&2 and 6&7 get glued up in pairs. Again, in one of my traditional snare drums, I would glue the rings together all at once in a custom built vacuum press. With the amount of money and time sunk into these blocks though, I feel way more comfortable using the much slower but more controllable clamp approach.

5613 - The center section (centerpiece?) of Afzelia and Blackwood glued up and sanded to silky perfection. All that remains is to flatten the Amboyna ring pairs and glue the whole shell blank up into...
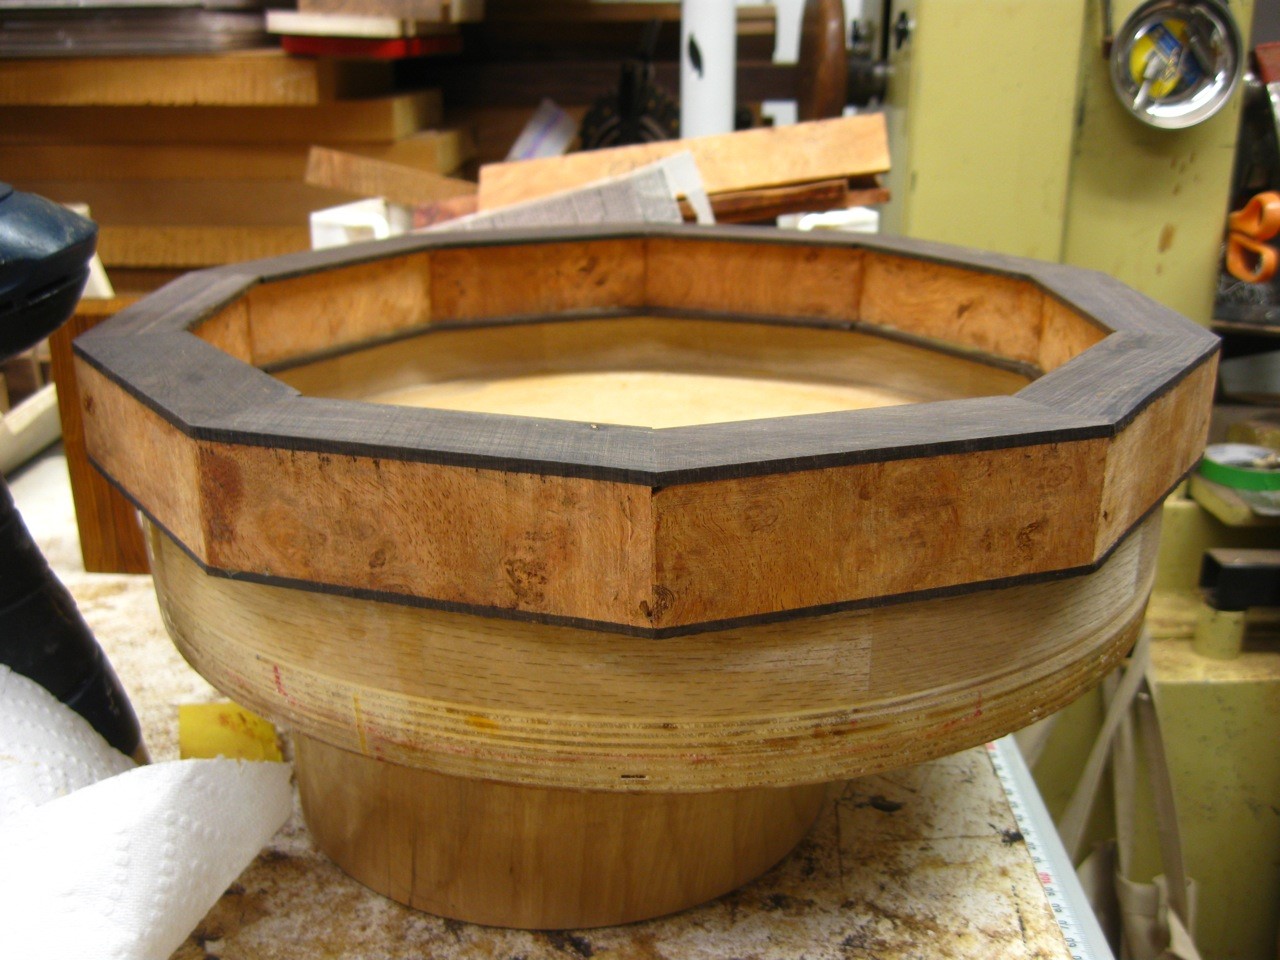
5625 - ... a very lovely pineapple. I'll start coring the inside in the morning, and very soon this shell will be ready for the beginning of the finishing process.
More soon Bob - I have also been working on a bunch of your goodies in the background, and have a couple of pretty cool items that I think you are going to love.”
Chapter 6: Exploring the Woods
[Pete S.] “Please find attached some progress photos of your Empyrean. Working with Amboyna burl is a bit of a double-edged sword - the material is beautiful and utterly unique, while also being extremely finicky due to the many voids and bark inclusions that produce its amazing figure.
I can honestly say though, that this is one of the finest drum shells I have ever built. The joinery is exactly what I was shooting for, and the wild grain and colour in both the Amboyna and Afzelia burl are off the chart. I want the shell to be perfectly flat across its depth so that the gloss reflections are dead straight, and this takes a great deal of care due to the different densities of the African Blackwood and Burl woods, but I feel great about the way this one has turned out. It is also really important that the sanding prep before the pore filling and high gloss stages is done right and that all of the sanding scratches are removed before I change to a higher grit sandpaper. This takes a lot of sandpaper, good lighting and an eye loupe, but most of all patience.
Here are some progress photos with narrative from the last couple of months...
5633 - The outside of the shell is rough turned oversize to reduce the weight and provide a round exterior surface for the next step.
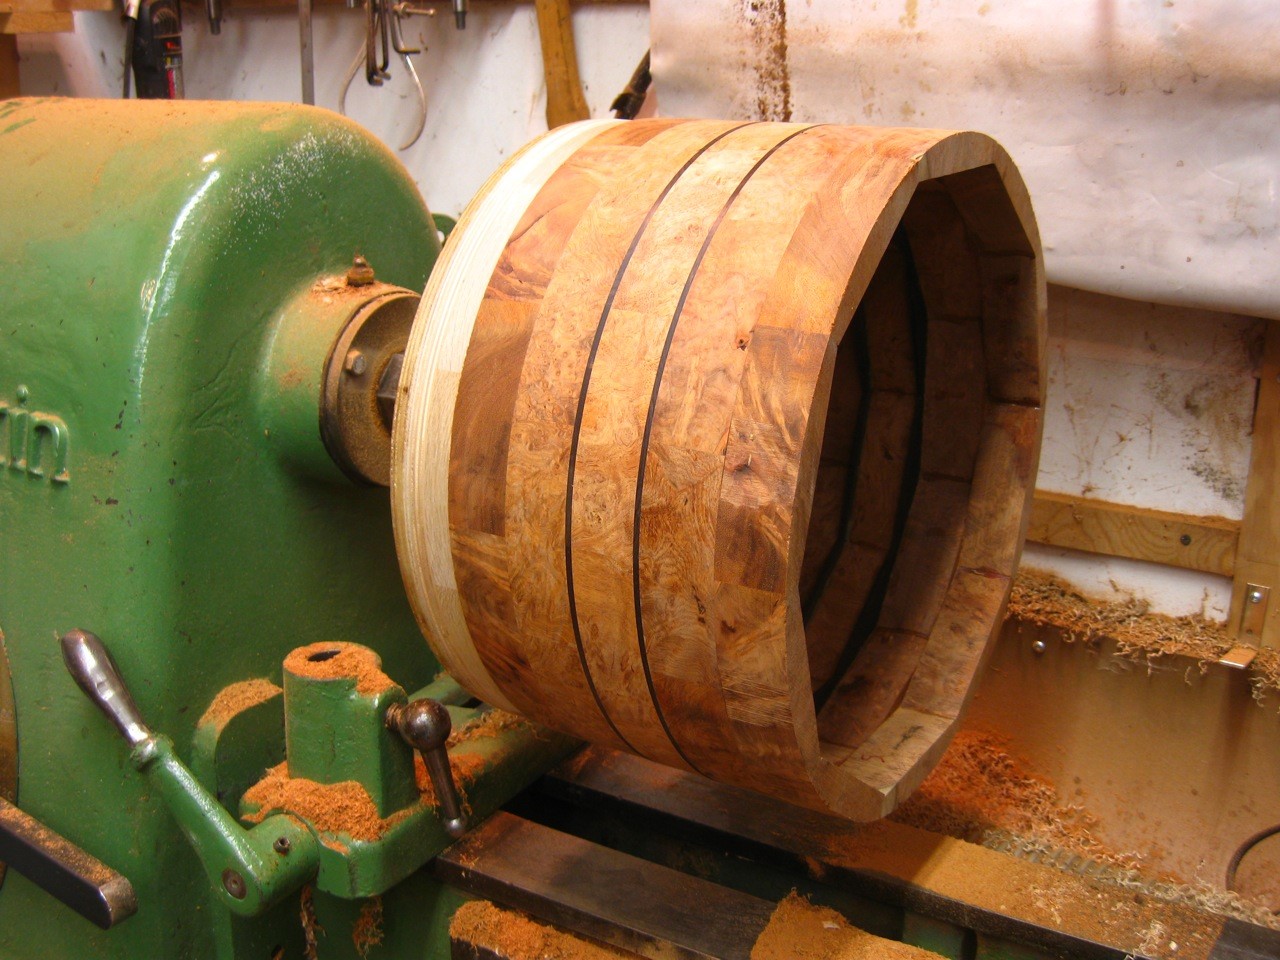
5638 - In order to minimize harmonic vibration and chatter while the shell is spinning, I dampen the free end of the shell with a shop made steady-rest built from a pair of inline skate wheels (retracted in foreground). This reduces chatter and makes for a much better interior surface finish directly off the tool.

5877 - Gorgeous grain swirl and burl eyes a plenty. Although the white balance was wrong in these two pictures, I think you can see why this is the most expensive and prized wood in the world. The shell is still about 1/64th of an inch proud here, but will come down to exact OD with a few long sanding sessions. To get this piece ready for pore filling, I hand sanded with 120, 150, 180, 220 and 320 grit sandpaper before moving to a Random Orbit sander to get rid of any radial scratch pattern. Total time sanding was about 8 hours over three days.

5880 - This is the interior surface directly off the tool - it looks pretty good, but there are still some small radial grooves visible. In order to make the inside smooth and ready for sealing, I spent 3 hours with a sanding block to bring it into perfect focus. The inside is sealed with a few very thin coats of shellac.

5884 - Into the finishing shop. Here a sealer coat has been applied, and the first application of pore filler has been squeegeed onto the surface and baked in my UV oven. This material dries rock hard and must be sanded flat so that it only remains in the pores and voids of the shell. Normally I would use two coats to completely fill the grain - with this wood I am using four. Each cycle takes about half a day to apply, cure and sand back.
5898 - The pore filler is clear so it doesn't alter the appearance of the wood. I use an eye loupe to check for sink-outs in the finish - it is hard to tell from the picture, but this shell is completely filled and just about ready for high gloss. Just a little more... sanding.

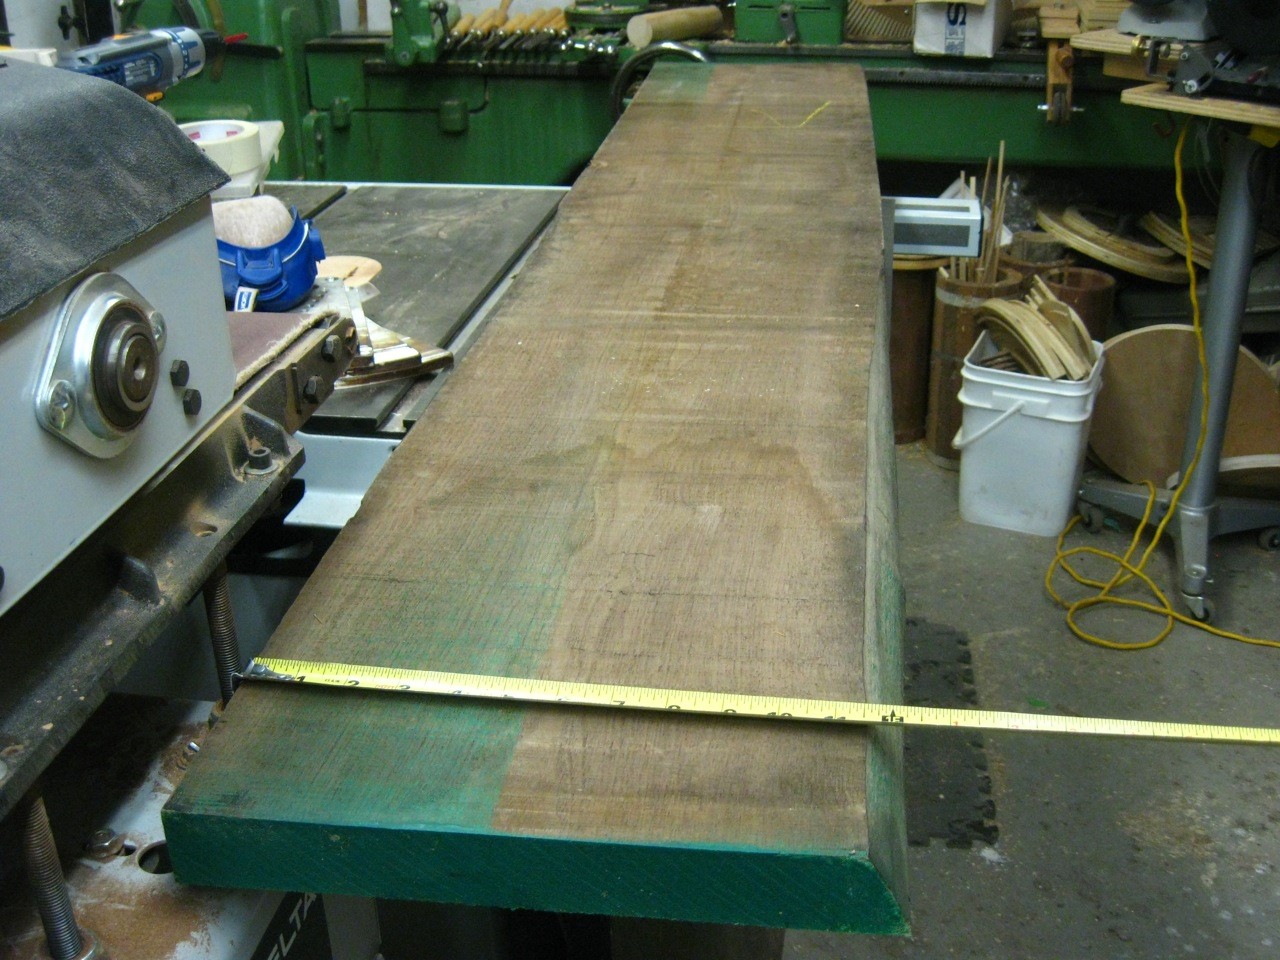
5931 - This is the Black Walnut for your drum case. I will re-saw this one plank (12 inches wide by 1.5 inches thick by 72 inches long) to produce a four corner matched case. Still haven't decided on all of the interior fittings, but I will be working on this over the next few weeks, and I will send you some pictures as we proceed.
More soon…”
Chapter 7: Getting on my Case
[Pete S.] “Hope your summer has been going well and that you had a good time with Todd the other night. Please find following some more pictures and commentary regarding your project. I am still on schedule to ship your drum to Todd during this break from Styx dates, so I am hopeful that you will be seeing her in early October as I mentioned in my last message. More to follow as we get closer to a ship date.
Hope you are well Bob - thanks again for your patience and support.
All the best…
6234 - Here are the Black Walnut planks I have chosen for your drum case after being re-sawn. By splitting the boards and book matching them, I can create a 4 corner grain match that flows around the drum case.

6260 - I don't want to give away all of the bells and whistles, but here is the plywood mock-up for your case. It has a bunch of cool features and the inside is going to look dynamite as I am working with a very talented local textile artist on the plush interior.
6336 - One again, here is your sealed and pore filled drum shell prepped for the spray booth and my tried and true UV cure high gloss.

6350 - A final scuff sand prior to applying the Todd signature, and shooting the first three coats of high gloss. The quality of this burl is astounding - every segment is like a little painting.

6365 - Three coats down, another 5 to go. This picture is from a couple of weeks back and the shell is now complete and ready to be finish sanded and buffed.
6394 - In the meantime, I have been working on your hoops. Here I am truing up the hoop blanks in preparation for drilling the tension rod holes. I built a super cool measuring jig (using a laser pointer) to indicate some of the major diameters, but all of this work is done by hand.
6396 - Next, the hoops are locked into a rotary indexing fixture I designed, which allows me to drill any number of equally spaced, accurate holes in hoops from 6 to 26 inches.

6403 - Turning African Blackwood is both a challenge and a joy. It is necessary to re-sharpen my chisels and gouges after only a few moments of contact with this incredibly hard and resinous wood. But - the finished surface really is incomparable.

Chapter 8: Can You Box That To Go, Please?
[Pete S.] “Hope you are doing well and getting into that Fall kind of groove. We have been having some beautiful days recently, including a number of high temp records and a bearable amount of rain, so no complaints about the weather (for the moment). I did just make my appointment to get the tires swapped over to our winter studs however.
Here are some photos of the progress of your Empy over the last few weeks. I have spent a great deal of time on the case and interior, as well as all of the little amenities that will be nestled on board. At present, the cases are with the artist who is doing the interior fabric and foam. We have done a bunch of different hand dyed textile samples and I think the finished effect is going to be great.
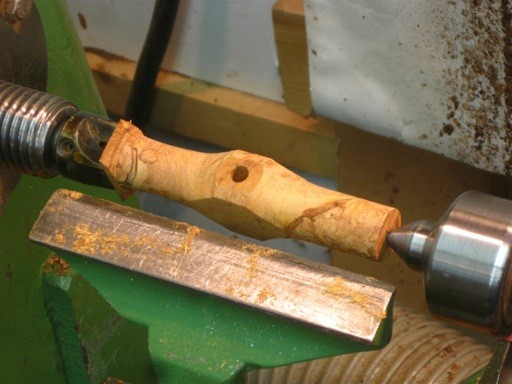
6427 - I'm making an African Blackwood pen here - at over 2,000 pounds, this is perhaps the largest lathe ever used to turn a 2 oz. pen.

6430 - I tried a few different designs for drum key handles before I settled on one I really liked. This is an 'also ran' in Afzelia Burl.
6434 - In order to achieve the best 4 corner grain match, the walnut for the drum cases needs to be book matched and laid out properly. I really didn't want to mix up any of the parts after all of this work.
6436 - Here I am cutting the box joints for the case joinery on my table saw. It takes a good number of test fits before the jig is dialed in to run the actual parts.

6437 - Woot! - didn't mess up and the boxes fit together with a satisfying amount of persuasion.
6440a - Much sanding is required to prep the boards for finishing. I used three coats of Danish Oil followed by paste wax for a baby's bum smooth surface.

6441a - Another of those operations that could go horribly wrong (but didn't). After they are glued up and the finish is applied, the lids are cut off the cases on the table saw.
6444 - The spare 'Player's Hoop' rides along in the lid of the case, along with a pair of Todd's signature PM 330s.
6446 - I decided to build a sweet little Rosewood box to hold some of the luxury items accompanying the drum.

6447 - Still not sure how I will hinge the lid, but something will suggest itself I'm sure. They kind of have a baby grand feel to them I think. Holy Faziloi!
6451 - Of course the primary purpose of the case is to protect your Empyrean, so the structure of the insert and surround is very important.

6453 - These babies are ready to ship out for the interior fabric install. I don't do a lot of flat work (as the wood-turners would call this), but it is satisfying despite being excruciatingly slow.

I'm back to finishing up hoops and shells, along with all of the million other little details that these drums require. We're very close to a ship date now - I have been keeping in touch with Todd regarding his schedule so that we connect during a break from touring. Hopefully I'll be able to have these in the air in the next couple of weeks. I will keep you posted.
All the best”
Chapter 9: Exotic Toys for Drummer Boys
[Pete S.] “Here are some pictures and commentary from the past few weeks. I have been working through the last details for your project, and we will soon be ready to ship her off for Todd's shakedown, but I want to make sure I am happy with every aspect of the instrument and package before it moves on. Its almost complete and I am pretty sure that you are going to love it. As you can see, I tend to make a number of variations for each item in the extras box - let me know if there is something that you really love, but otherwise I will just make sure there is a nice variety of wood species.
Here are some photos and commentary…
6466 - A few of the pens I have completed - from L to R we have Big Leaf Maple Burl, African Blackwood and Cocobolo.

6468 - Some keychains in (clockwise from the top) Roasted Birdseye Maple, Curly Maple, Amboyna Burl, Ebony and Snakewood.

6471 - Drumkeys (clockwise from top) in Maple Burl (w/ chrome), Cocobolo, Amboyna Burl, Curly Koa, Cocobolo (w/ chrome), Figured Cocobolo.

6482 - Here is the case lid. Local textile artist Kumi Stoddart dyed the fabric using fern leaves as a resist to create the patterns, and hand-stitched the lining and foam cushioning. I'm really pleased with the overall effect of the textile, and each case will be completely unique.
6494 - Here's a shot of your throw off handle (prior to Swarovski’s). I used 3 pieces of Amboyna Burl with 2 sections of African Blackwood for strength and stability, and epoxy to hold it all together for the long haul.

6506 - Each hoop receives an African Blackwood pinstripe made from solid stock. I carefully cut the Blackwood on the bandsaw and sand it to precisely .124 of an inch to press fit into a .126-inch groove. I pre-bend the inlays using a heat gun to avoid cracking them while installing, and scarf joint the ends so the seams are invisible.
6510 - The inlay is glued into the groove and clamped up overnight, then the hoops are sanded perfectly flush and the finish is applied.

6513 - These are solid wood badges with gold foil embossed on Amboyna Burl and African Blackwood - let me know which one you would like on your instrument.

6514 - Here is the seam in the Blackwood pinstripe after sanding - it is dead centre in the photo. Not bad, eh?
6519 - And finally, the case with almost all of the bells and whistles in place. Hope you like it - I think it does the drum justice nicely
All Best - more news soon…”
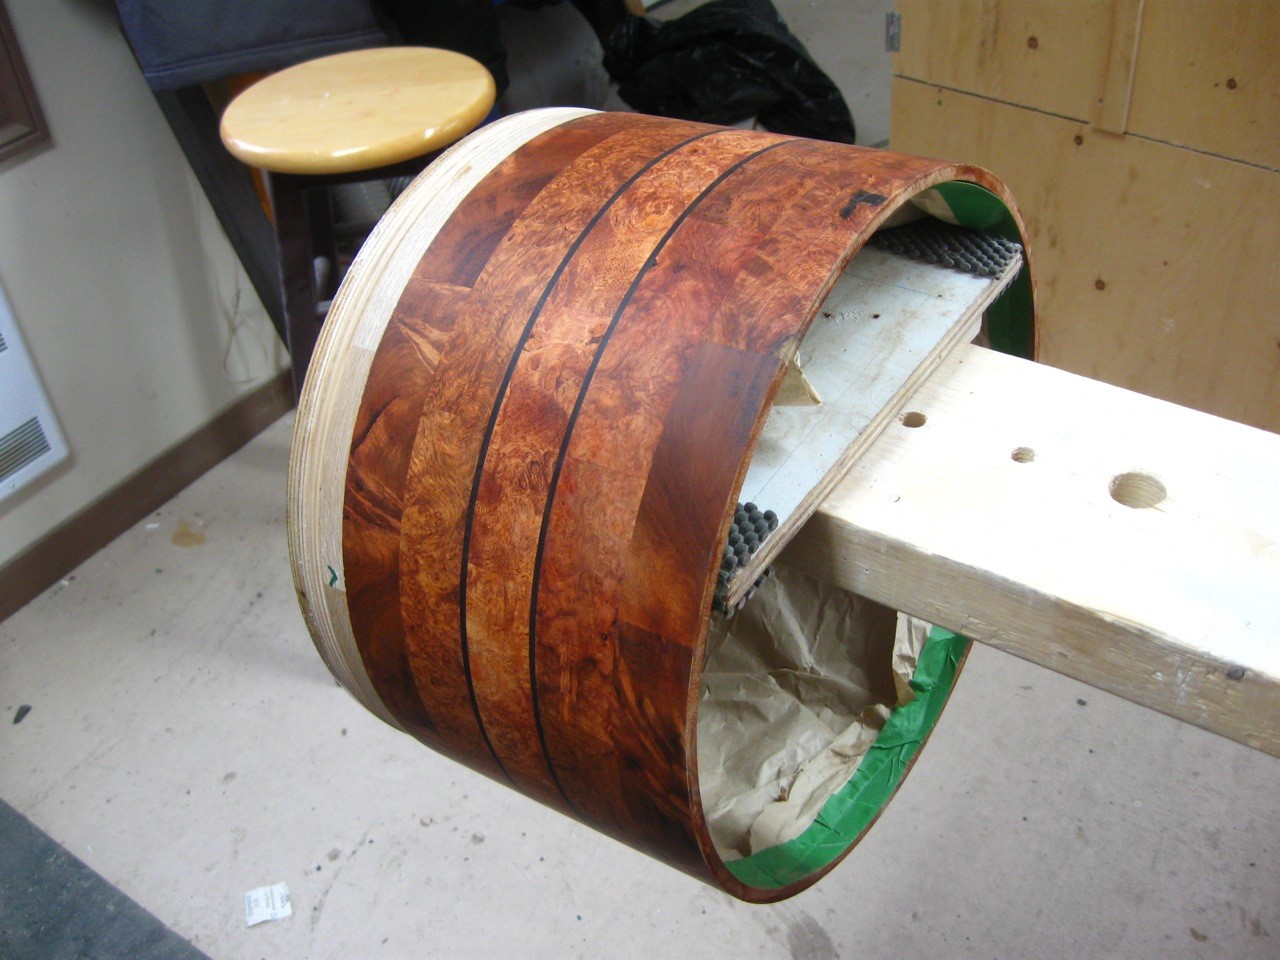
Chapter 10: All Lacquered Up and Giddy
[Pete S.] “Great speaking with you just now, and I forgot to ask if winter had overtaken you yet. We got a few inches last night, but hopefully that is the end of it for a while.
Here are a few more shots of your instrument in progress. I didn't include any pictures of your hoops, but they are completed as well, so we are really getting down to the final few details now. I'll keep you updated on the shipping status to Todd over the next week or so.
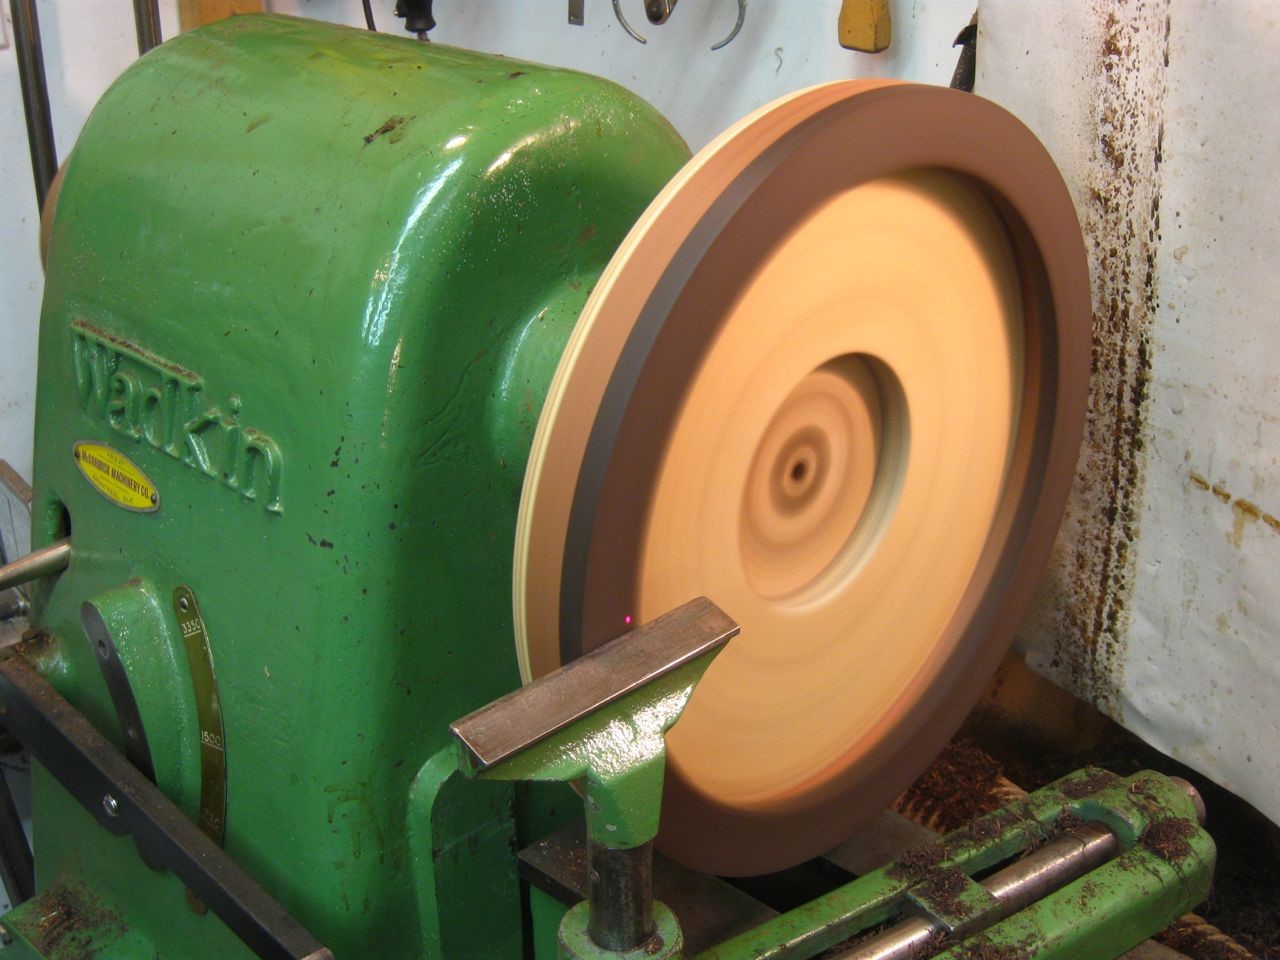
6558 - The final wet sanding stage, after many hours of power and hand sanding. To bring the lacquer up to a high gloss, I start by machine sanding through 800-grit, and then wet sanding by hand to 2000.

6561 - This jig allows me to spin the shell (slowly) and hand cut, sand and polish the bearing edges to any profile. I use this jig to rotate the shell while I hand cut the bearing edges with lathe chisels. Notice my little shop-made steady rest reducing vibrations in the foreground. Sadly, my daughter can't find her inline skates these days.
6564 - After the edges are finished I use a stationary buffing machine and a number of ultra-fine compounds to bring out the gloss in the body of the shell. The completed shell after polishing. The burl looks like it is buried under glass.
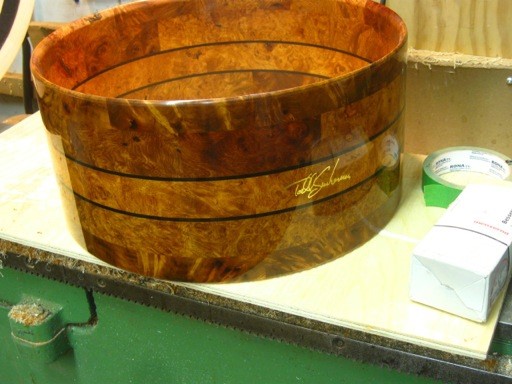
6565 - Looks pretty darn shiny I think. The wildly interlocking grain in the burl is kind of mesmerizing.

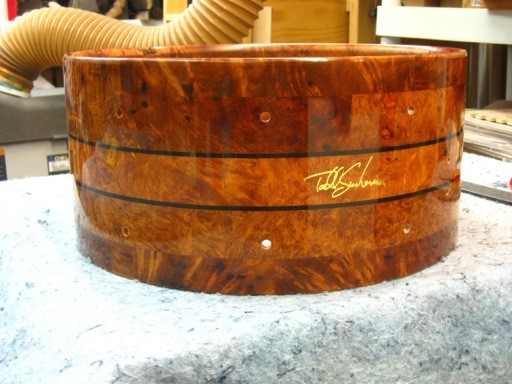
6579 - More green tape. Remember the old adage - measure 4000 times, drill once. It still freaks me out to map and drill holes for the hardware - nowhere to hide if I screw up here. She's mapped out and drilled and now I can exhale.

6580 - My heart rate returns to normal after the tape is gone and I have verified that the results are perfect – Wowza! The way light shimmers and refracts when you look at some woods from different angles is called chatoyance. Yep - this baby's got that in spades.
Hardware tomorrow. I'll let you know how we are doing very soon.”
Chapter 11: An Empy is Sighted in Canada – News at Eleven
[Pete S.] “Happy New Year! We left Newfoundland to travel to Ontario to see the extended family on Dec. 18th - just in time for a major ice storm that brought down about 25% of the trees in my parent's community, and knocked the power out for the better part of a day. Their place escaped major damage but the neighbours took a direct hit from a Maple tree and lost their brand new deck. After lots more snow and cold conditions in and around Toronto, we flew back home on New Year's Eve to find that St. John's had been buried under 120 cms of snow over the time we were away. On January 2nd the power utility started rolling blackouts in an effort to stave off a major outage because of the increased electrical demand from the cold temps. Unfortunately, this didn't work, and January 3rd our power went out for 30 hours during a blizzard with the temperature at minus 19 and wind speeds of 120 kph. Another 40 cms of snow and a half dozen more blackouts over the next few days kept things frosty and uncertain, so schools remained closed for three days until the grid was stabilized. We have a generator to keep our well pumping and the fridge and freezer running, along with one room heated, but once my stockpile of gas started running low we discovered that every station in town was out of fuel. Fortunately it has started to warm up a little today, and we are looking at a fairly mild stretch for the weekend at least.
So, it has been quite a start to 2014. Needless to say, I haven't spent much time in the shop up until now.
Your drum however is done, and I am just working on a few additional details with the case and accoutrements. The drum is amazing - I am very proud of this one, and can't wait for both Todd and you to have a chance to shake it down. My plan is to have it out to Todd in the next couple of weeks so that it is waiting for him after this run of shows, and then we'll bring together the final elements to the package. I'm including some progress pics and will be shooting the 'catalogue shots' in a few days - I'll forward these once they are done.
Hope you had a great Christmas holiday Bob, and all the best for 2014.
Photo details are as follows...
6582 - Case is almost complete - I have only a few little details left on the exterior (like a Todd signature).

6585 - Custom fitting the accessory box is time consuming but very fun for a wood nerd like me.
6600 - Yowza! She's a total babe, and I think you are going to be floored by this one.
More soon”
Chapter 12: One Step Forward, One Drop-kick Back
[Pete S.] “Some troubling news from Todd today. He arrived home this morning and discovered that the Empy case had sustained some shipping damage sometime during its long journey from me to him. He suspects that it was dropped on one corner with enough force to split the 5/8th-inch solid Walnut panel in the lid section. I had sent it via Canadapost Expresspost, as I have had very good luck with them - this being only the second piece they have ever damaged. The carton I used to ship was the biggest they allow, and despite a healthy amount of bubble wrap, it didn't stand up to their abuse I guess.
The bright sides are as follows…
The drum itself is perfect - there is not a scuff or any damage whatsoever. I have another identical case that I will have complete by Friday - I just need to add a couple more embellishments and get the accoutrement insert done and she will be ready to go.
This time I will be shipping via UPS - it is considerably more money, but they will take a larger carton so I will do a double box thing and we will be fine.
As you can imagine Todd and I are both supremely bummed out by this and can appreciate how you must feel about it too. I'm including a couple of pictures to tide you over until you have the drum and case in hand. I'll let you know when the replacement box goes out and the ETA to Austin.
All the best…”


Chapter 13: In God We Trust; the Postal Service Will Take More Prayer
[Pete S.] “The new case and accessories are on the way to Texas and are guaranteed by next Thursday. I am using Purolator this time around, so hopefully they will be more gentle than the nasty Posties, although I have packaged this baby up like… well… a baby, so I am expecting a safe trip.
More soon - all the best…”
Chapter 14: And in the Beginning, There was an Empyrean
[Todd] “Hi Bob, I bring good news!
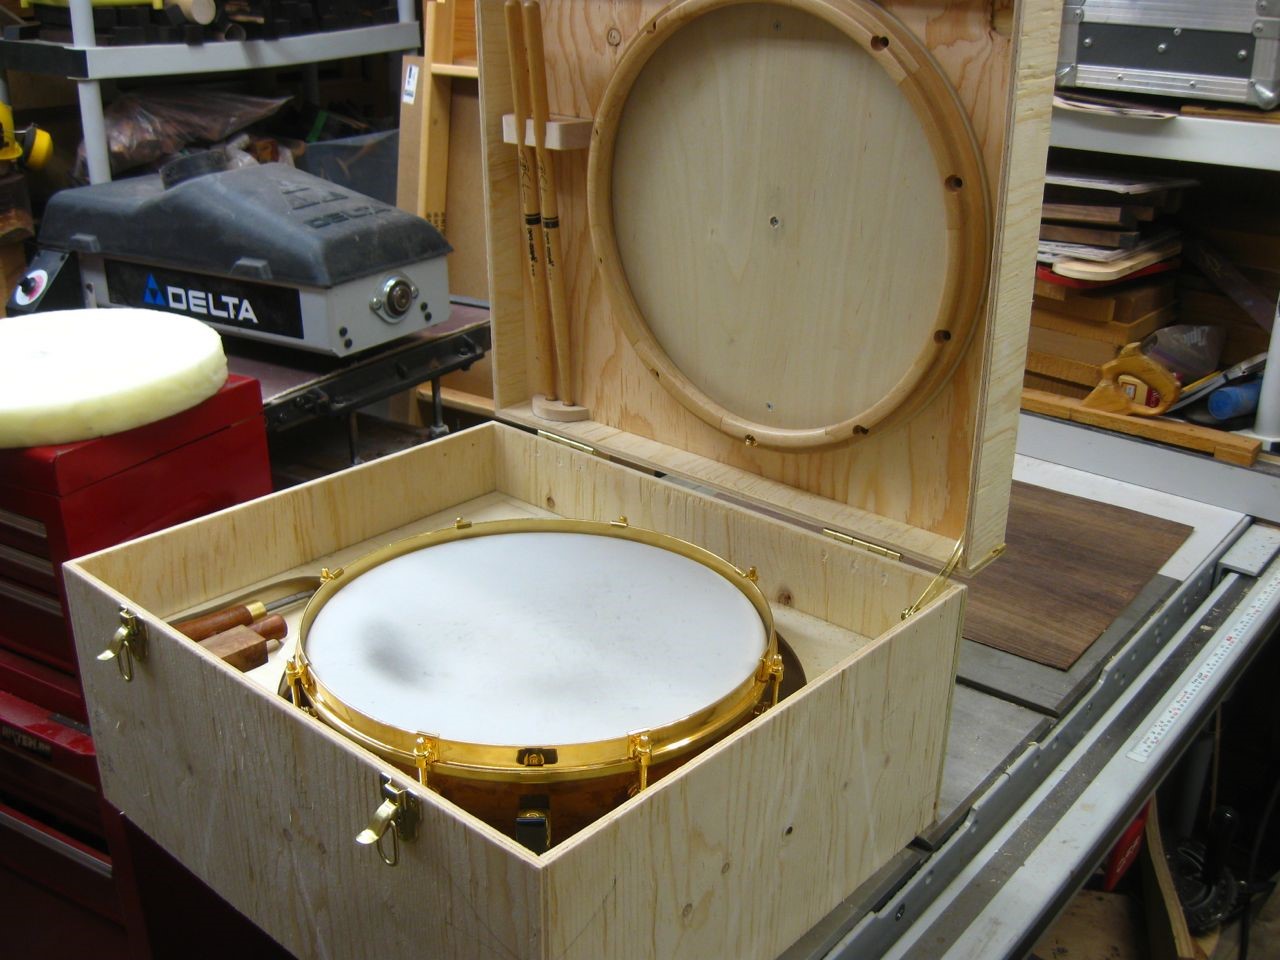
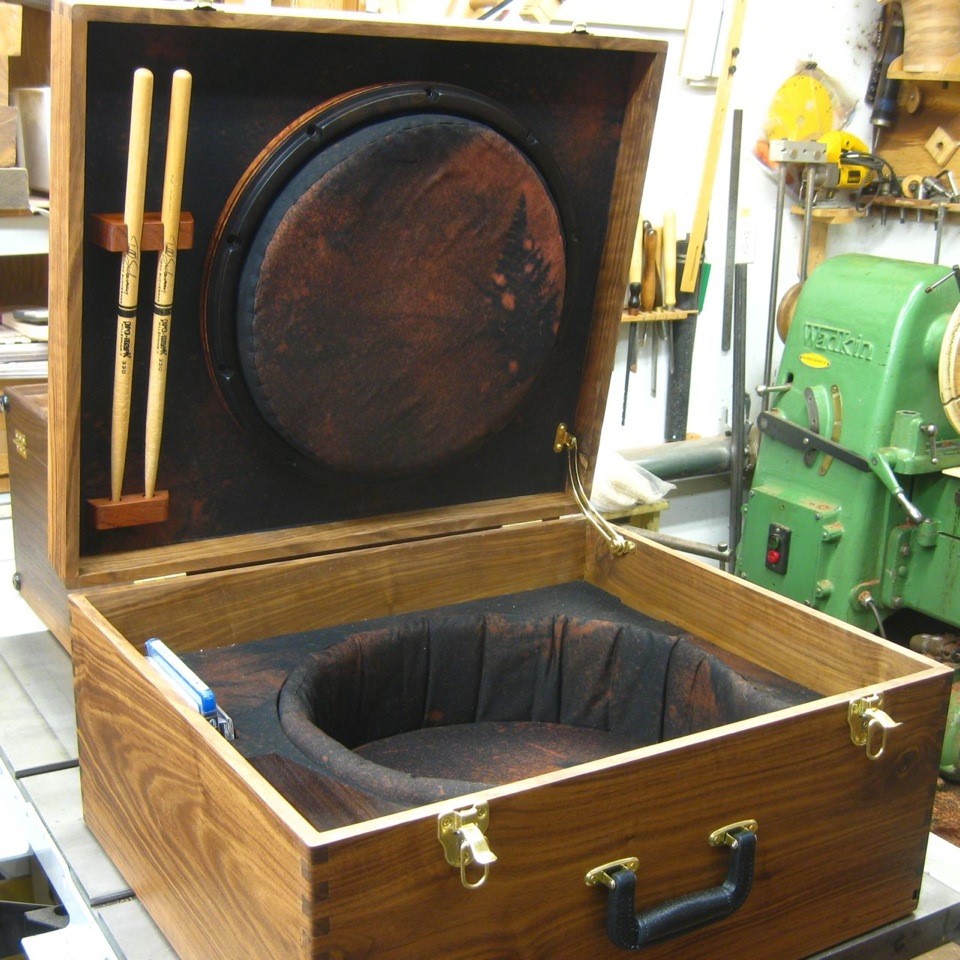
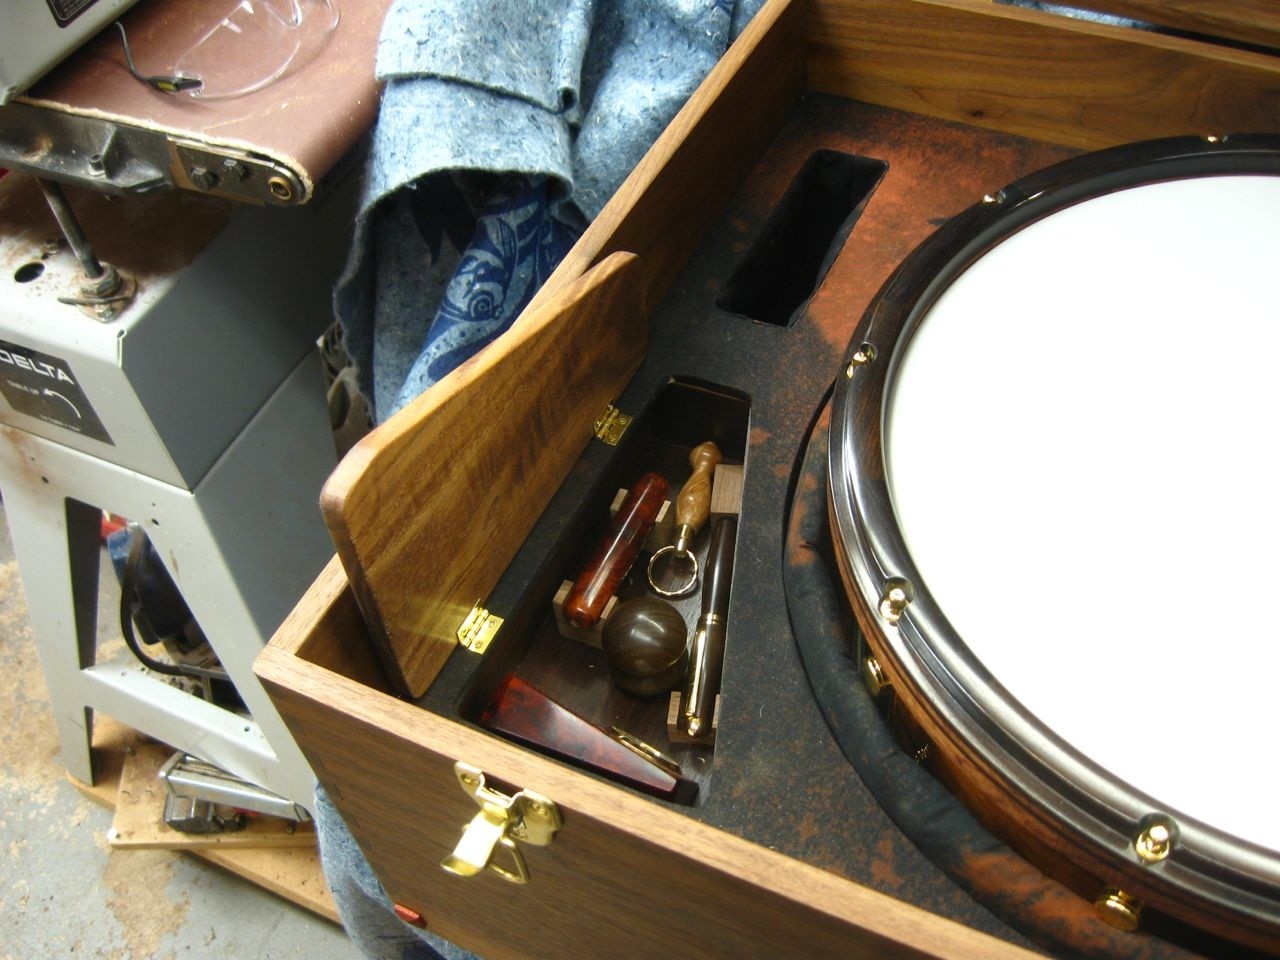
The box arrived safely today. I have spent part of the day in the studio tuning it up and taking pics and vids. Pete and I feel that we should send the luxury accouterments and other special things in a separate box than the one that contains the drum. While this takes away a bit of the "wow" factor when opening the box, it creates a "safe" factor that will stand a greater chance of everything arriving in a pristine state. So that notion wins the day. All the luxury items fit inside the case, there a space for a pair of sticks, all this will be obvious and of course as shown in the picture book that Pete is sending you directly.
I was hoping to ship this out tomorrow but Monday looks like a greater reality, as my mother is in for a visit and it's evening time late on Thursday. I know my UPS guy so I can set something up for a Monday pick up with swift ease. Sorry to add a couple extra days, but it will all be worth it.
I will send you tracking info and please let us know when the eagle lands. We await your feedback, and we hope you are as thrilled as we are. You are #1 in the most personalized signature instrument ever offered before in history. From my home to yours (originating at Pete's of course!)
Thanks, congratulations, and I will email you on Monday
Cheers, Todd
PS. Here's a teaser...”


Chapter 15: The End and The Beginning
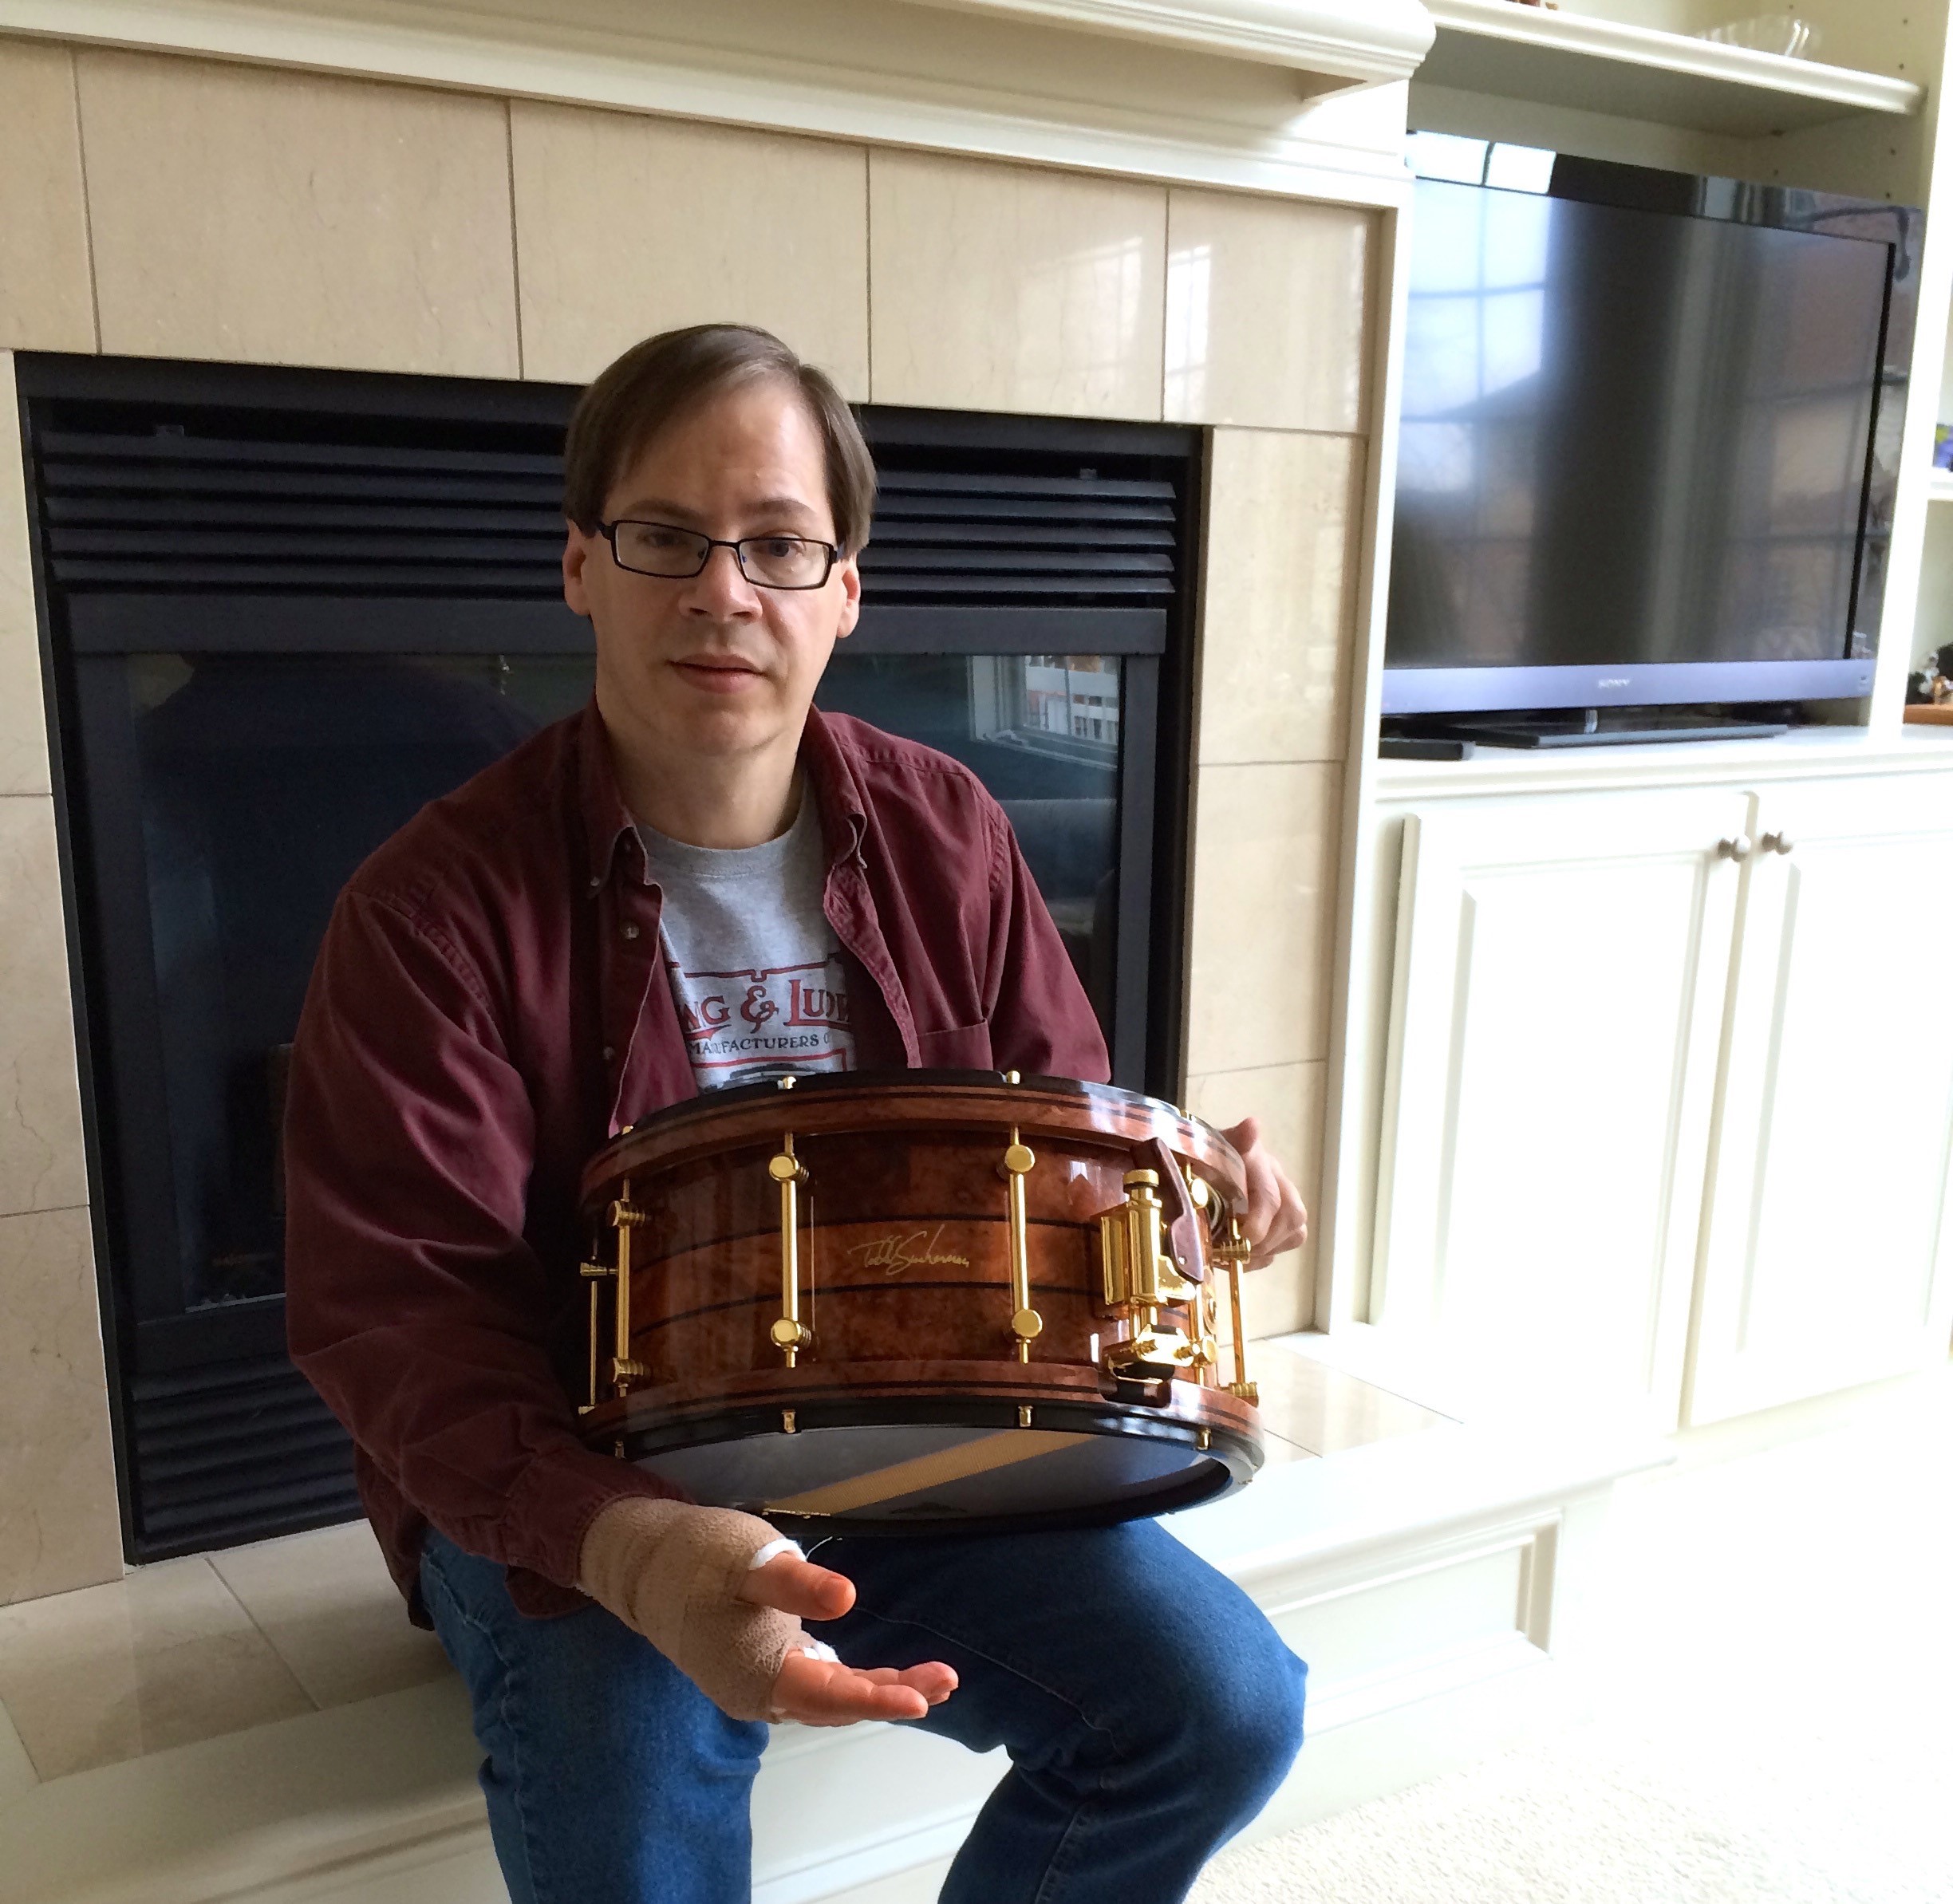
Note: I had surgery on my thumb (tendonitis, a.k.a., Trigger Finger) the day my Empyrean arrived.
[Pete S.] “Thanks for the message and I hope your hand will heal perfectly and quickly.
I'll admit that I have been holding my breath for the past few days, as the prospect of the drum or this case being damaged would have been a little bit much for me after all of this. I am including a couple of shots of the interior of the case, just so that we are on the same page about how things fit together, even though I'm not sure if you have the time or mobility to put it all together yet. You will notice the little spiral bound photo album in the photos - this was for the first case and accouterments package, so I redid it with the new gear and it is on the way to you by mail - should be there very soon. The idea is that this fits in the little padded pocket with the Styx CDs and DVDs.
Thanks for your stoic patience throughout this project. It obviously took some twists and turns that none of us were expecting, and I have to admit that I seriously underestimated the complexity of some of the elements of this whole concept. However, I am extremely happy and quite proud of your instrument and all of the accompanying bells and whistles, and I do feel like we have created something completely different and special here. I look forward to chatting with you soon, and hope for a speedy recovery for your paw.”
[Bob email to Pete & Todd] “Well, my dream snare drum has arrived. My wife helped me unpack the drum today - truly stunning! The case is really wonderful (and heavy). Well worth the wait. Thanks so much. I only wish I could play it. It will have to wait. Todd - thanks for the vids! Very nice collection of exotic wood toys and cool stuff to add to my shrine of Todd/Taylor/STYX. The pics of the drum in progress are particularly special to me.
That’s the limit of typing for today…hurting a bit now the anesthetic’s worn off…
Thank you Pete for your meticulous attention to detail. It really pisses me off though that I can’t play it! When my hand deals, it will definitely be the first drum I play!”
Chapter 16: Epilogue
[Bob to Todd] “Doing much better - thanks! Can play only a limited time and nothing with any great dexterity. Just happy that it only hurts a little... Loving my Empy!!!”
[Bob to Todd] “Had a good time playing the drum today. My hand is much better since the surgery. Glad to have my thumb functional again! BTW, this drum sounds as good as it looks – phenomenal!”
So was it worth it? Did the drum speak to me (without alcohol or drugs)? Indeed, it is one of the most breath-taking wood shell snare drums I’ve ever seen or heard. I continue to enjoy the way it sings when I play (and exponentially more so when Todd plays!). The wood hoops warm the tone, add some punch and produce wonderful, articulate cross-sticking and rim-shots. The sensitivity is to die for. I’ve had friends come over and play, and they’ve been equally impressed.
Richie Jarvis (freelance drummer, Australia) was the recipient of Empyrean #2 and was equally blown away by the sound, look, and build quality.
"Just after NAMM 2015 I took delivery of of my Stanbridge/Sucherman Empyrean (Build No 2 ) and from the first opening of the case I was in love with this fine piece of art but I wasn’t able to really to give the drum a proper shake down until my return.
Once home I soaked up what I would call the ultimate collectors snare drum down to the finest details like the Swarovski crystal in the snare drum lever, then came the fun part. The tonal range of this hand made drum was phenomenal with an overtone was dark and very chocolaty tuning from the low “baseball bat to a pie” all the way to “crank city” it was simply breathtaking but no matter where the drum was tuned it never lost its personality.
One major test I have with any drum is the rim click and I was not disappointed with a rather potent but very pleasing woody crack, The Empyrean from the rim click, ghost notes to a full blown shotgun like crack has a refinement of pure class at any volume and volume this drum defiantly has.
Recently my Empyrean was on loan to Todd himself on the Melbourne leg of the Drumscene live tour and he made the drum sing, from a medium tuning point this got the entire backline staff's attention and started to draw in a small crowd to not only see Todd’s playing but to see the beauty of The Sucherman Empyrean. I think what really amazed me about the drum after that weekend having seen it being played by the man himself at full force, no holes bared hard hitting playing was the wood hoops…….not a single mark was left, simply one of the most amazing pieces of drum art ever to be created."
This drum is one for the history books. I hope that someday 100 years from now, this drum will have been passed down to another, and that owner will value not only its beauty and character, but also the pedigreed history that it embodies. In each Empyrean, there is the spirit of both Todd and Pete, an essence that lives as long as we remember this drum’s story. An Empyrean is born; long live the Empyrean.
---
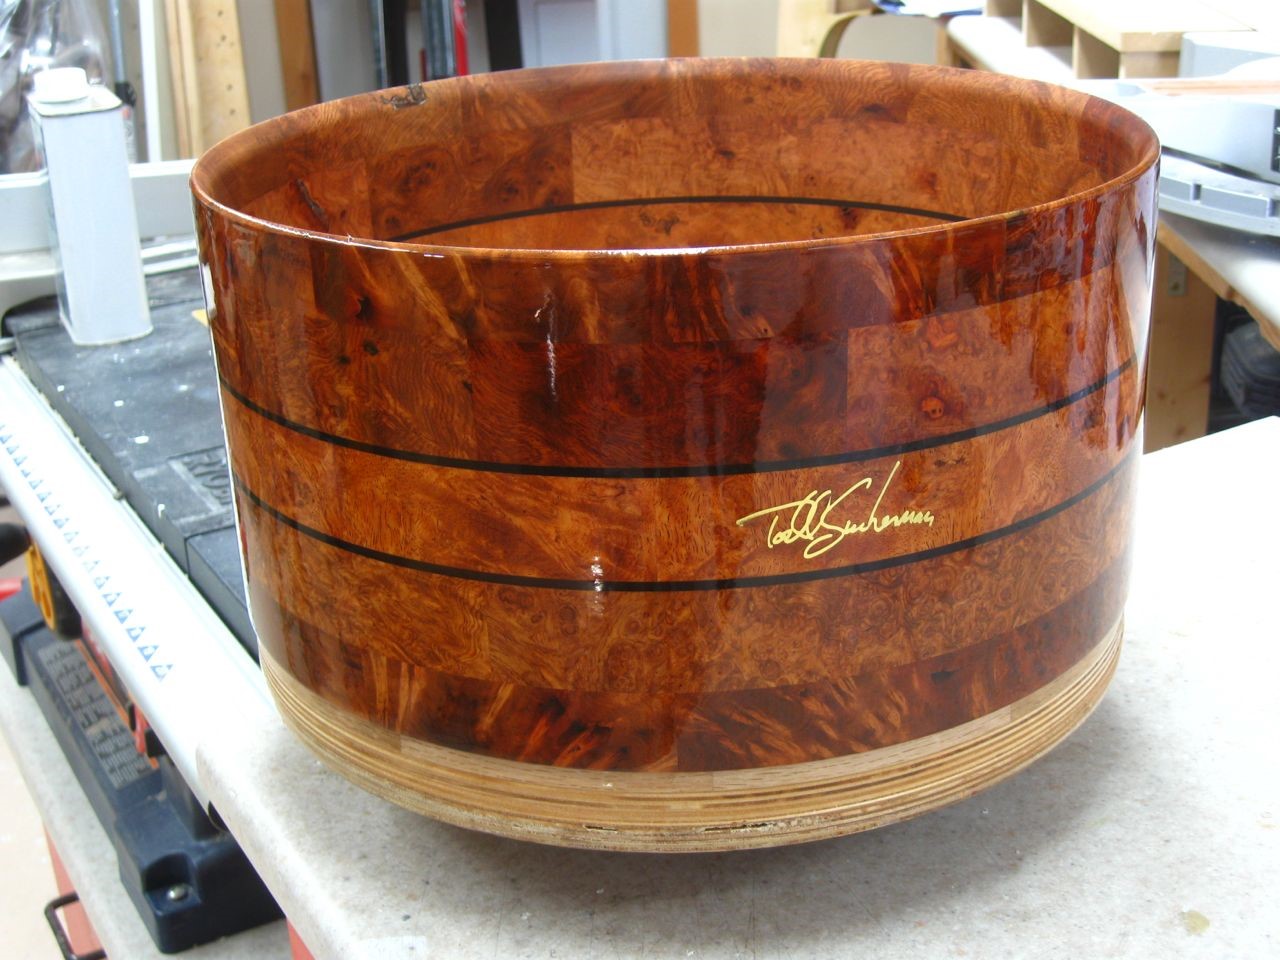
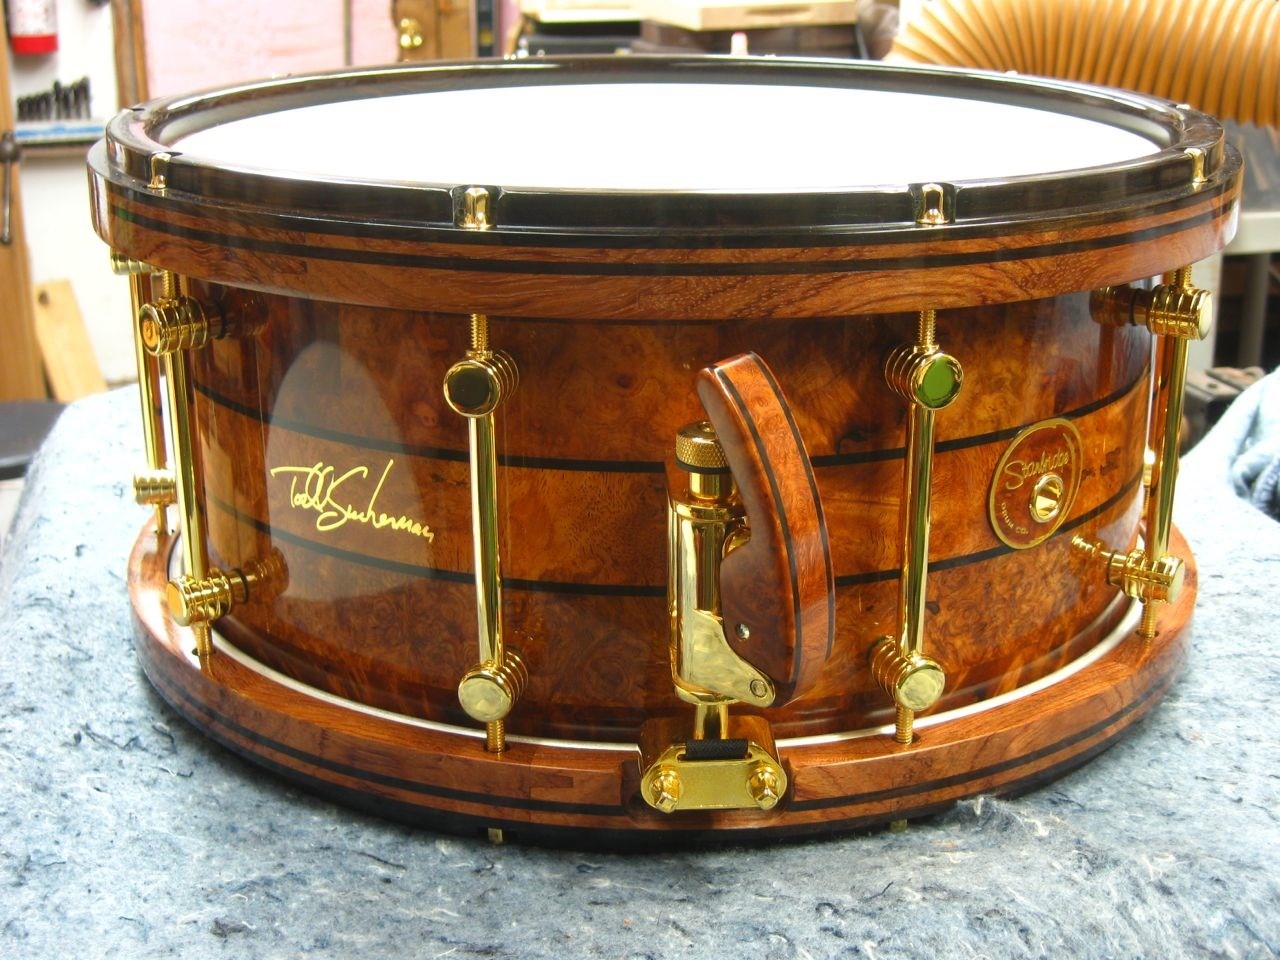
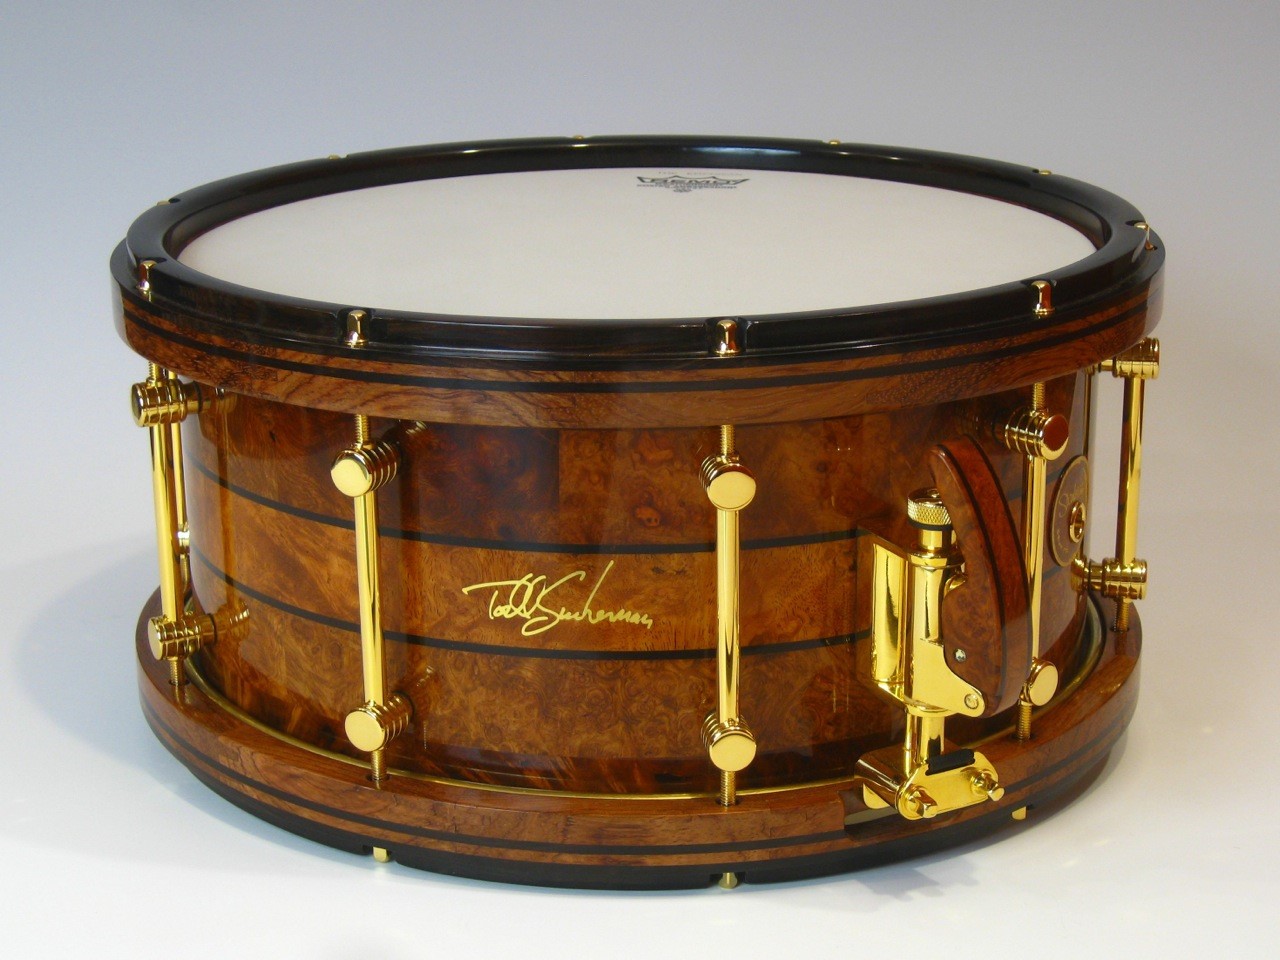
Empyrean Specs: 6.5X14” segment shell drum (5/16” thickness) with high gloss finish, consisting of rare exotic woods: figured Amboyna Burl, Afzelia Burl and African Blackwood; African Blackwood and Bubinga wood hoops. Fitted with a modified Dunnett throw-off with Amboyna Burl handle and Swarovski crystals. All hardware is 24K gold-plated: 10 Stanbridge brass tube lugs, tension rods, throw-off, butt plate and air vent. Each drum has Todd Sucherman’s signature in gold on the outside and a paper tag on the inside with the serial number, date and hand-written signatures of Todd Sucherman and Pete Stanbridge. Each drum comes with a unique Black walnut presentation case lined with foam and velvet.
Trick Steampunk Kit

Let's step back a few years to the 2011 NAMM show with Trick's Steampunk Kit!
Read moreHow To Date 1960s Ludwig Drums By Serial Numbers

Prompted by the insurance industry, the new regulation mandated serial numbers on certain goods, including drums. "Up until then," said Mr. Ludwig, "some of our drums were date stamped and some weren’t - but none had serial numbers. Our dealers begged us to put them on, so we had our badge manufacturer imprint sequential numbers on the badges for all of our drums."
Read moreMike Clark: Words of Wisdom, Part 6

Chapter six in an ongoing series of commentary from legendary drummer Mike Clark. His storied observations continue to inspire, and provide keen insight into ‘all things music’.
I was lucky my Mom loved jazz. At age five I would bring my Gretsch Broadcasters into the kitchen while she was cooking, play for her and she loved it. The neighbors would say, “how can you stand that noise”? She would say, “what noise”? He sounds like Gene Krupa.
My other heroes were Zutty Singleton, Cozy Cole, Lionel Hampton, Big Sid Catlett, Louie Bellson, and Buddy Rich. At eight I discovered Art Blakey.
My experience with Herbie Hancock happened when he became emotionally involved, and it was on the real. It was the most inspired and highly spirited music...Definitely not for the faint of heart. He would bring this to any genre...It was like John Coltrane as far as power, energy, emotion, and dialogue...Herbie is from that school in my humble opinion...Deepness Reigns!!
Don’t you just love it when you lose something and someone says -where did you lose it? If I knew that, I would know where it is and it wouldn’t be lost!
BB King… It is going to be weird without him. I am just so used to that sound. I know we can hear the music, but he has always been there. I’m glad I got to meet him.
BB King once asked the Headhunters to play a tune with him. Everybody plays some deep stuff trying to show BB they can play the blues. Hancock plays some totally avant-garde solos like something you would have heard on an Eric Dolphy record in 1963. After his solos BB takes the microphone with a confused look on his face and says…”Well, everybody has their own way of playing the blues”.
I once realized there was something missing deep in my life.... so I bought a cowbell!!
DW Workshop Series
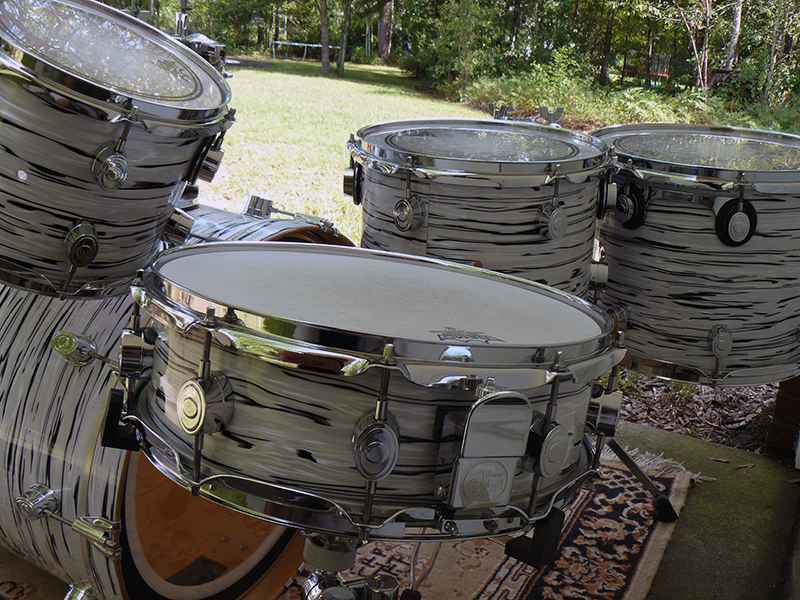
The Chicago Drum show in May was all I expected it to be. My only problem was I didn't have enough time to really dig in and see everything. My wife and I drove to our son and daughter-in-law's home in Charlotte on Friday. It was hard to sleep Friday night. I was extremely excited about going to the show on Saturday. My son and I started out early Saturday morning with a flight to Chicago. We rented a car and drove out to St. Charles to the fairgrounds where the show is held. I thought I would have plenty of time to see everything and visit with friends. There was so much to see and it was time to catch a plane back to Charlotte before I knew it. If I get to go back next year I will definitely plan to have more time. There were so many people there I wanted to talk to, and if I didn't get to speak to you, I'm sorry. I highly recommend that you go to a vintage drum show if you possibly can. Watch for announcements in the magazine for shows around the country.
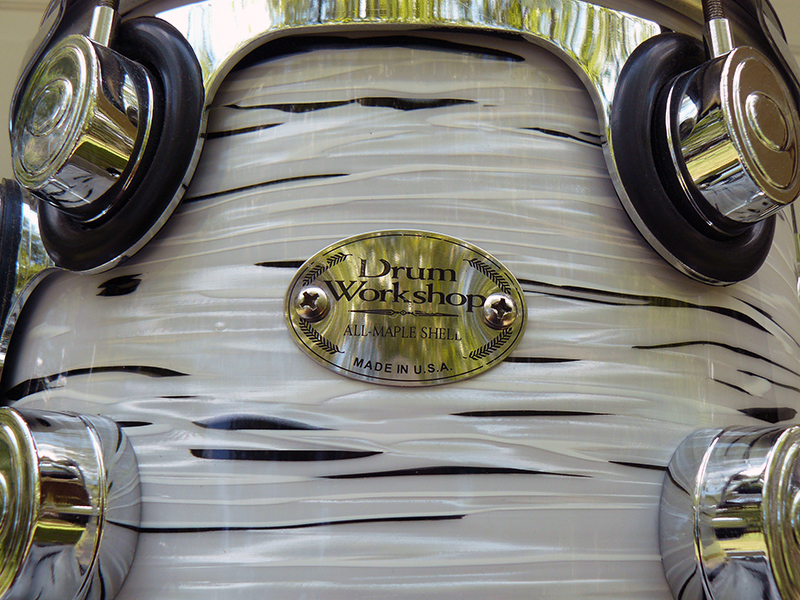
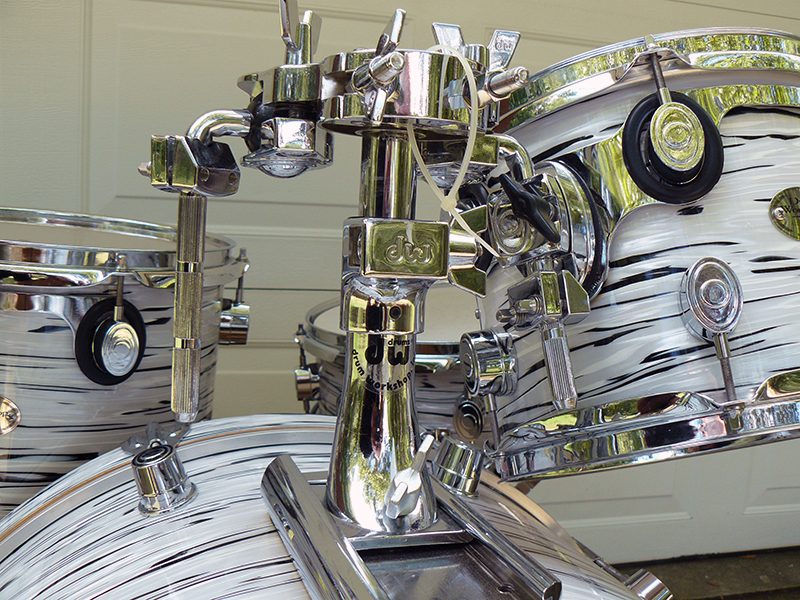
The drum kit I want to feature this month is a beautiful set built by Drum Workshop. I know you are all familiar with the awesome drums this great drum company is making. The Collector Series is the flagship drums of Drum Workshop. They have the Aristocrat lugs like the ones made popular by George Way and Camco drums. Drum Workshop is built on the foundation of Way and Camco. The Workshop Series line of drums was the company's first attempt at a second line of drums. It was a set that was offered to the working and hobby drummer at a slightly better price, but still very high quality in every way. The most noticeable difference was the oval lugs instead of the round lugs. Another difference not so noticeable was the thin Keller shells without reinforcement rings. These drums sound fantastic. The first Workshop Series drums were limited in colors and sizes. That soon was scrapped because there were special orders for Workshop Series drums in special sizes and wraps. Drum Workshop officially only made the Workshops a couple of years, but continued to make them for special orders for quite some time.
The following information was gleaned from a drummer's forum. There was no name given, so I can't give proper credit. The facts are good and answers a lot of questions about these great drums.


BACKGROUND INFO ON THE DW WORKSHOP SERIES LINE:
"My drums are DW Workshop Series, made in the U.S. in 2000. There is much confusion surrounding this somewhat-rare line offered by DW.
I have read a lot of messages of people inquiring about DW Workshop series drums with most replies having bits and pieces of truth with some personal opinions thrown in. Lots of readers want to know about their quality and their price range. The Workshop series for the record were indeed 100% DW drums. They were manufactured in the USA (Oxnard), contrary to what some people have been stating. They were never made in Ensenada, Mexico. They were manufactured with what resembles the PDP lug to distinguish them from the Collector series.
They were built for only two years. They were made without reinforcement hoops, and were meant to be DW's good, mid-range product. Since they were just as expensive to manufacture as DW's Collector's Series, they were discontinued. Apart from that, they were favored by many DW endorsers in spite of the Collector's series.
They were DW's first go at manufacturing an American made "mass produced" set. They didn't offer the custom features like timbre matching and had limited finishes. The finishes were a high-gloss lacquered all-maple shell, or a Satin-Oil all-maple shell. The drums, aside from the different lugs, garnished authentic DW hardware as in the snare strainer. bass drum spurs and tom mounts. Again, 100% DW. DW dropped this line after about 2 years in production because they became too costly to produce, rivaling the production costs of their collector series, but they didn't carry the same retail price tag.
So with that, the line was scrapped in favor of the Pacific line. With the technology they gained making the Workshop series, they started to produce the PDP's in Taiwan. Pacific’s were not originally manufactured in Ensenada. DW chose to move the PDP line to Ensenada in the mid 90's to keep the costs down on the shipping tariffs from overseas and to be closer to the factory for quality control. But to state it one more time, the Workshop series was an American manufactured all-maple set. The sound is impeccable and they do not have the reinforcement ring for a broader sound, something DW is now offering (priced) on their Collector series sets. All the Workshop series drums have a DW badge with a serial number stamped on each shell stating "Made in the USA."
The Bottom Line Facts: These drums were "Made in the USA", with the same quality maple and parts that go into the Collector's Series drums. The only difference- apart from the differently-shaped lug housings, is that these have no reinforcement hoops. This difference is said to give them more sustain and a more open tone. I completely agree. I didn't buy these because they were less than the Collector Series: they just sounded better, more open, to me."
The toms on this kit I am featuring has a 10", 12" and 15" configuration. The bass drum is a thunderous 22"X18". The matching 14"X5" snare is also a very nice touch for this set. This set was obviously a special order and not a standard Workshop Series Kit. The tom sizes and the Ultra White Oyster wrap clearly had to be ordered. If you have a set of Workshop Series drums please comment. I live for your comments.
Hope you have a great Summer.
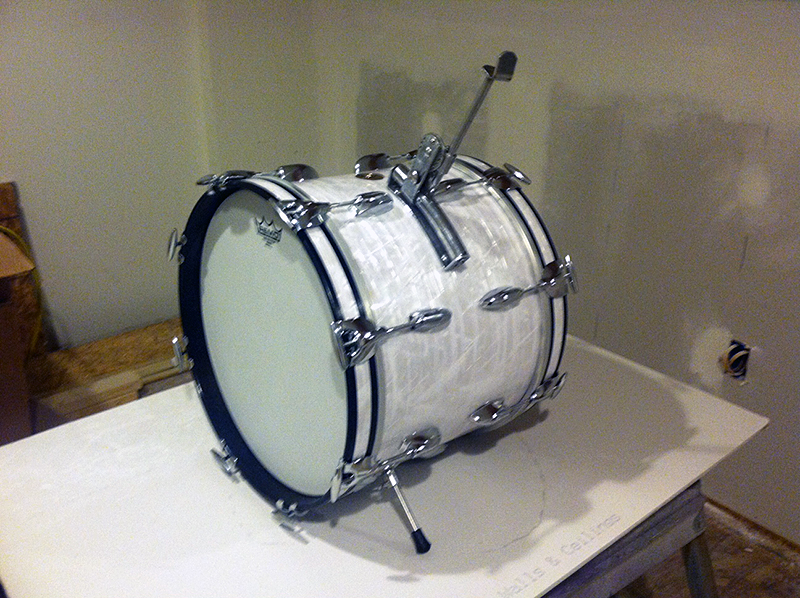
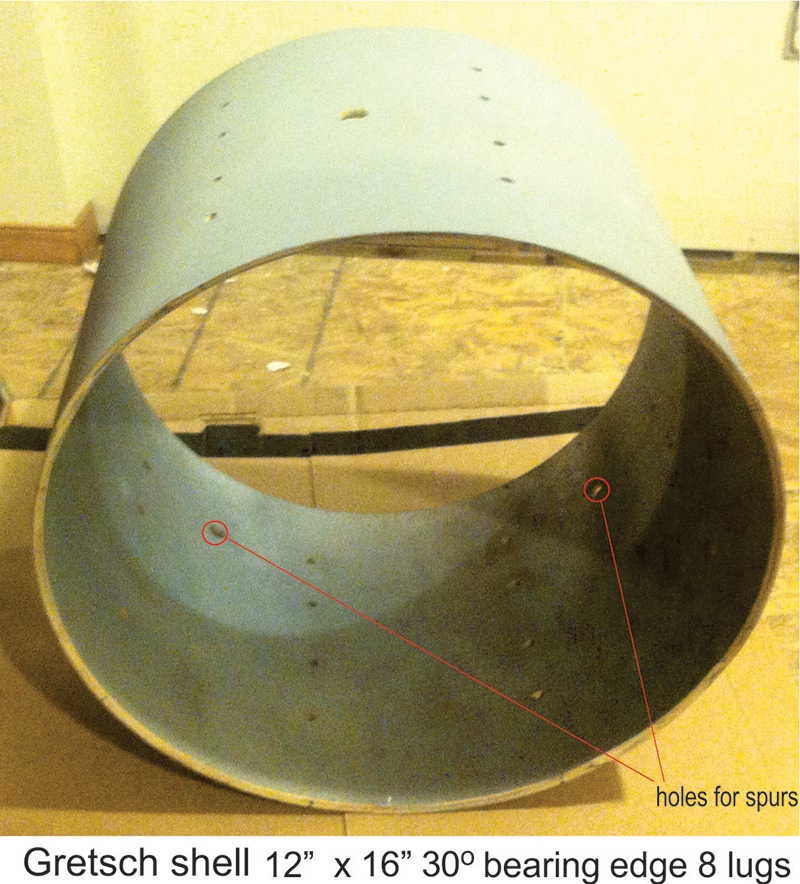
Gretsch 12x16 Bass Drum
Here's something you don't see very often, Gretsch 16" x 12 " bass drum, restored with mostly original parts, all parts are period correct..
Yes it's the real deal.
Ronnie Owens Drums

1935-36 Ludwig & Ludwig Silver Anniversary Black Beauty
By Mike Curotto


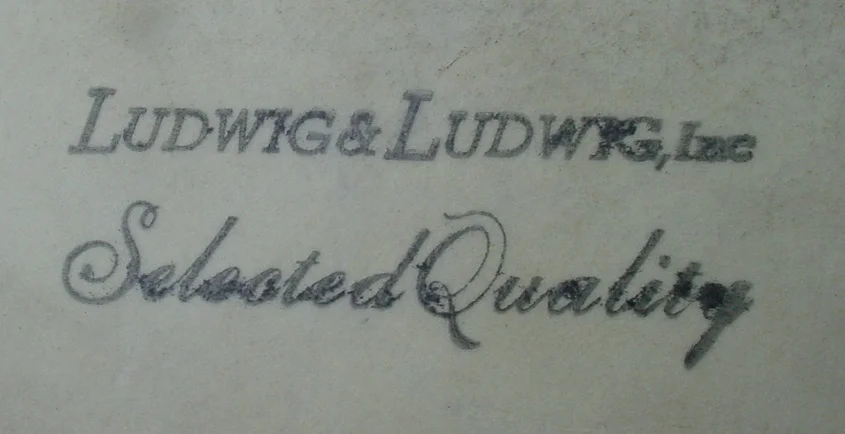

1935-36 LUDWIG & LUDWIG 6.5 x 14 SILVER ANNIVERSARY BLACK BEAUTY
Hi all,
Here’s another snare that I was able to add to the collection...fresh from the 2015 Chicago Vintage Drum Show. I got this drum from Joe Luoma, he had one to spare so we sealed the deal over the phone 3 weeks prior to the Show and culminated the deal at the Show. Thanks goes to Joe for helping me to add another cool and very rare drum to my collection. Joe’s drums are always pristine so this was an easy cleaning.
The SHELL:
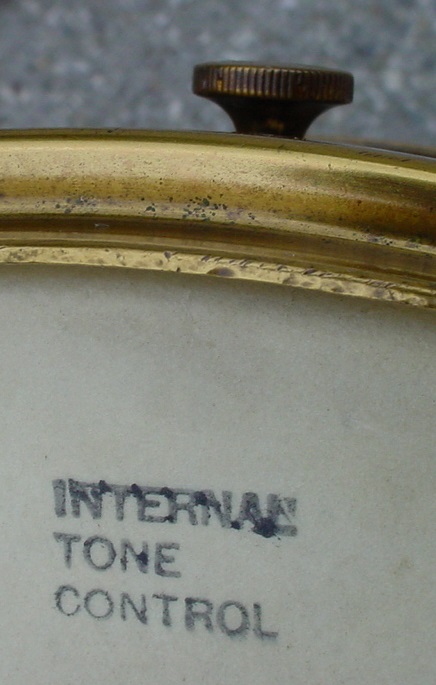
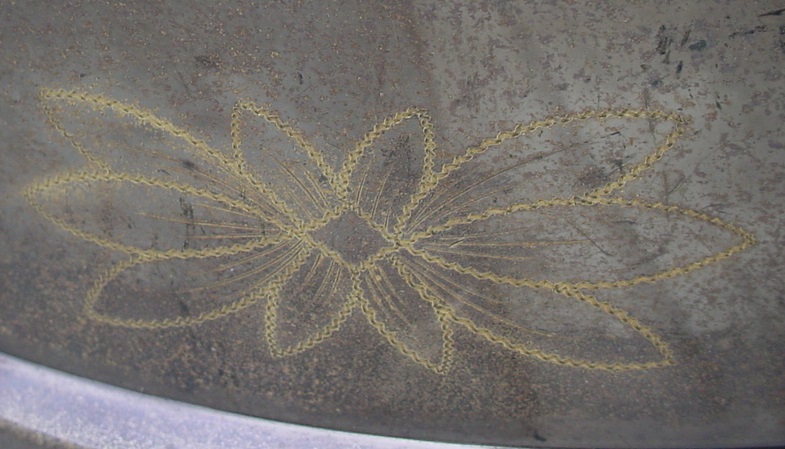
The “sparse” later 1930s 10 pt. floral engraving pattern is clean and in good shape. The black nickel is also in good condition with some normal “freckling” that is to be expected on an 80 year old drum. I just gave the shell a minor cleaning with some lemon oil and all is good.
The HARDWARE:
Around 1932 Ludwig changed their Artgold (bright copper plating /gold lacquer) DeLuxe hardware option to Classic Gold (brass plating/ yellow gold lacquer). The Classic Gold on this snare drum was in very good condition and only needed a basic cleaning. The threads on the tension rods needed the most cleaning. One side of one of the tapped Imperial lugs was stripped but my good friend Al Schneider, The Drum Doctor, did his magic with a 12-24 Heli-Coil and as I’ve mentioned before, do not let stripped “Anniversary” lugs be a deal killer, there is a fix, a 12-24 Heli-Coil is the correct fix.
Of-the-era calf heads (note the tone control stamp on the top head) and James Snappi wires rounded out this simple cleaning.
Silver Anniversary Black Beauties are extremely rare, there are only 5 known at this writing and every one is different but I do realize that there is always the possibility that there are others out there. Be sure to weigh-in if you see or hear of another Silver Anniversary Black Beauty out there in vintage drum land.
Here’s a list of the 5 known Silver Anniversary Models:
- 5 x 14 gold plated Standard Model (Joe Luoma Collection)
- 5 x 14 gold plated Super-Ludwig Model (Joe Luoma Collection)
- 6.5 x 14 chrome plated Standard Model (Bun E. Carlos Collection)
- 4. 5 x 14 chrome plated Super-Sensitive Model (Mike Curotto Collection)
- 6.5 x 14 Classic Gold Standard Model (Mike Curotto Collection)
Enjoy!
Luka Solid Bock Sugar Maple Snare Drum

Here's something you don't see very often, Gretsch 16" x 12 " bass drum, restored with mostly original parts, all parts are period correct.
Read moreThe Life and Times of Master Craftsman, Johnny Craviotto
So with the help of the master boat builder and much trial-and-error, Johnny began making his own one-ply drum shells. By 1984-85, Johnny had started to perfect his technique. Word of his drums spread until it caught the attention of Billy Gibson (Huey Lewis & The News). Billy asked Johnny to join forces with him to form a drum company, the Select (later changed to “Solid”) Drum Company.
Read moreGoodman Quilted Maple Stave Snare
The Goodman Drum Company sent in a very high-end snare drum for review that sounded great on my gig last night (and I’m pretty picky). The instrument’s body is a 14 by 5.5 Quilted Maple stave shell that is 5/8” thick and has a double 45 degree bearing edge. It has wide and deep snare beds similar to the old Slingerland Radio King bed which I personally like because of the responsiveness. The flawless, grade A quilted maple wood has a beautiful hand rubbed clear coat that takes two weeks to apply and has a UV inhibiting agent. The hardware on the drum includes ten polished solid aluminum center lugs with receiving tubes that give it the look of a tube lug drum, die-cast hoops, a Trick throw off, and Pure Sound snare wires. The 3 small unique snare vents in the shell are aligned vertically in one panel of the drum and sit flush with the shell. No cheap hardware on this drum. It appears they using only top shelf parts. The badge is die-cast with a script logo on a glossy oval background trimmed with a silver/chrome-ish border. Very understated tasteful badge.

Sound? This is a full-bodied snare drum sound. At high, medium and low tunings the fundamental note of the shell is very present. It was very easy to tune and the feel of the tension rods turning in the lug threads was very smooth. The resonance and sustain in the head was very pleasing and musical from the edge to about 2/3 the way in to the center at which point the head became progressively drier until it was very controlled at the very nodal point in the center. I like a snare that allows me to hit in the center for a dry, short, snappy sound but with the option of moving away from center to use the natural ring in the head for longer tones. The snare wires respond very well from edge to center and I was able to dial out sympathetic buzz from other drums with the Trick throw off . The snares sounded great at tight, medium and loose settings. I think this can be attributed to the superb bearing edges snare beds as well as the superior Trick throw off and Puresound snare wires. I’ve noticed that some snare drums with die-cast hoops can be very one-dimensional; too much fundamental and not enough overtones or splash, all crack and no tone. Not with this drum. The die-cast hoop did not “choke” the drum. I usually prefer a triple flanged hoop because I find that die-cast hoops don’t give me enough tone and splash. Not so with this drum. It had a lot of what I call nice “gonk” tone in the sound (think Bill Bruford), which I find is usually missing in many drums with die-cast hoops. I also noticed that the difference between a regular loud hit and a rim shot was not that different in volume, but it was different in tone, which was nice. I play a lot of rim shots on backbeats but did not feel the need to with this drum. Most drums have a much seemingly louder report with a rim shot but the wide range of dynamics of the head hits on this drum with regular hits speaks to the superior response of this drum’s design.
Performance; I took this drum on a three-hour gig with an Allman Brothers tribute band. It was a very loud gig in a small club with another drummer right next to me. I had no problem hearing this drum even though there was no monitor and I had a hard time hearing the little 18” bass drum I was using. I didn’t feel the need to hit rim shots to hear the drum. The tuning held up well. No de-tuning of the tension rods.
Cons? Nothing. A+
The Goodman Drum Company is a three-year-old boutique company run by Chris Goodman Jr. and Sr., who also make other wood products. They make their drums out of rare, re-claimed, exotic and high-end tonal woods. The moisture content of the shell is very controlled at 6 to 8 percent until the final clear coating step. The drums are trued on granite and it is obvious that they are very concerned with producing a flawless instrument with much attention to detail. The Goodman's have plans for expansion in the near future. Their first 13” snare will be introduced in a few months. Lugs, hoops and tension rods will be made in-house in 2016 and their first drum kit will debut in 2016. Their goal is to go national with distribution in 2017. While their website is under construction you can reach them on Facebook.
CUSH Pads for Cymbals

This is one of those reviews that is easy to write because the product is so simple that it either works or it doesn't. It either does what the manufacturer says it does or it doesn't. This one works! CUSH pads are an alternative to the felts you use on your cymbal stand. They are made of a proprietary elastomer material, and are designed to allow the cymbals to ring longer and truer without muffling the sound or overtones. They don't collapse or take shape and always return to the original shape.
Read moreMike Clark: Words of Wisdom, Part 5
Chapter number five in an ongoing series of commentary from legendary drummer Mike Clark. His storied observations continue to inspire, and provide keen insight into ‘all things music’.
---
I played double drums on a gig with Lenny White once and he took a solo all poly-outness while I held my place quietly on the 2 and 4. He took it so far out I was hanging on for dear life. But Lenny was right, and here is the kicker...I was proud of myself for keeping my place. But he was the dude that played everything. It was amazing, as Lenny knows where he is at all times… But it really sounded like he modulated into about 80 different time signatures at once.
I love Art Blakey’s playing, his bands, arrangements, his groove… When it comes to swingin’ – Is there anyone that can swing harder? Not for me.
Does anybody but me get tired of seeing and hearing the same 6 or 7 guys playing all the festivals and jazz joints over and over? Who's idea is that? Or if there is a new guy… He has to make up some wild way of playing that most of us had thought of and discarded.
When I play swing no matter how far out I go, I play it on the 2 and 4. Same with funk… No matter where I put the backbeat, the "Thing" if you will is on the 2 and 4. That’s what I do.
I remember when you had to play several different styles of jazz… Usually a few you really liked best. It was hard to make a living specializing in one area unless you had really good luck. Now it’s hard to make a living playing any of those styles. Now I see that several guys stay in one bag for a lifetime and do OK. For me, that would be like eating eggs every morning forever.
Elvin Jones said he wanted to be part of the scene, but didn’t want to play in a conventional way. Elvin really didn’t hear that, and he was severely criticized for it. Being with Coltrane solidified his concept, and his words. How would things be if he didn’t have the good fortune to get that gig? How would things sound today?
I went to a mix when Tony Williams played, I was listening to the playback and the time sounded a bit soupy, Tony walked by the board and pushed the fader up to the top and the track swung incredibly, and it sounded like Tony. The engineer cried and whined about the fact that it red lined. Tony said, “the red line - that’s how jazz is supposed to sound”.
I admit it - when I played with musicians having great careers, I would be kind of nervous since I wanted what they had. While playing with Herbie Hancock, there was none of that. He was so famous I guess my brain processed it differently. In the last five years I’m finally over it. I really enjoy playing with anyone, no matter how much they’ve got. As long as the music is cool… That’s the end of it…I am actually in the moment. It took a lifetime… But better late than never!
When mixing drums for jazz, I would suggest listening to some old Blue Note records as many times as possible. Now the drums are compressed like a pop record and the tuning seems to be in between what used to be jazz tuning and pop or fusion. Also, the groove is in the ride cymbal… So don't turn it down and have it sound like mush.
Joyful Noise appoints Todd Trent as Chief Operating Officer
Joyful Noise Drum Company is proud to announce the appointment of Todd Trent as their Chief Operating Officer. Todd is excited to bring over 3 decades of percussion industry experience to Joyful Noise. Having been in music retail, artist relations with Ludwig Drums, wholesale / OEM sales and marketing with Taye Drums as well as pro touring management, Todd is well suited to propel Joyful Noise. He has been a fan of the product, their mission and leadership team since the beginning of the company and now feels the time is right to add his abilities to such an outstanding company.
1934-35 Slingerland Broadcaster
By Mike Curotto


Hi all,
Here's another one cleaned up and entered into the collection. I got this snare drum at the 2011 Chicago Show from our good friend and fellow collector, Mark Cooper of Cooper's Vintage Drums.
1934-35 SLINGERLAND 6.5 x 14 SPARKLING GREEN/ARTGOLD *BROADCASTER MODEL
*The Broadcaster Model was very short-lived so for those of you that may not be familiar with this model here is a short history and background data regarding the Slingerland Broadcaster Model. The following is from Rob Cook's Slingerland Book (first edition): "The Broadcaster was evidently a forerunner of the Radio King, the strainer is a very early Radio King style strainer and the lugs do not have inserts. (The tension rods thread directly into the lugs.) The muffler was the single-pad style Harold R. Dodd muffler." Thanks again to Rob Cook. I have also read that Slingerland was legally forced to discontinue using the word "Broadcaster" (with a "c") as the Fred Gretsch Co. had been using the name "Broadkaster" (with a "k") on their drums way before Slingerland and therefore the court ruled in favor of Gretsch that Slingerland's Broadcaster was too close sounding/looking to Gretsch's Broadkaster.
The Shell: The Sparkling Green wrap was in pretty good shape with very few of those black "cancer" spots that usually show up on these older Green Sparkle drums. I was able to get a few layers of age off of the wrap with my Maguire's cleaning/polishing regime and the Sparkling Green finish came back to life. The solid maple shell interior was also in good shape and only needed a very light cleaning. The cloud badge was tight and weathered the last 75+ years pretty well.
The Hardware: I'll call it Slingerland Artgold but the hardware finish on this snare drum really resembles the Ludwig & Ludwig Classic Gold (brass plating with gold lacquer) finish that L&L used on their early-mid 1930s Black Beauties. There was a lot of Artgold present but an equal amount of age and tarnish. I haven't figured out how to duplicate the Classic Gold finish yet so the decision was to leave the hardware as is and just do a simple cleaning with a light coat of gold lacquer to seal everything to prevent any further tarnishing. The 16 tension rods were not correct so I went to my stash and found the correct tension rods but these had to be brass plated, antiqued and lacquered. Thanks again to Les and Brian Hadnagy of Avenue Plating for the brass plating and antiquing. The threaded snare gates have the letter "A" stamped on the inside (not seen) part of the rim and gates. This is called a "manufacturer's cartouche", thanks to Slingerland expert Dr. Carl Wenk for that information. I'd love to know if those type of markings are under the riveted snare gates, feel free to send photos. The Slingerland Broadcaster engraving on the top rim is pretty faint but it is there. All in all, the "carpet matches the curtains" pretty well on this drum.
Of-the-era calf heads and extension wires rounded out this cleaning/restoration.
Enjoy!